Monday, March 31, 2014

Sugar Snap Peas

Yesterday afternoon I was going through some recipes for spring vegetables on Food & Wine when I found this recipe for Sugar Snap Peas with Soffrito, Hot Pepper and Mint. I was immediately drawn to it, and when meal planning shortly after that, I put it on the list for this week. I remembered that Trader Joe's sold bags of sugar snap peas and I thought this would make a tasty and healthy vegetable side dish.

Ingredients:


- generous amount of olive oil for sauteing ($0.40)
- 2 medium carrots, finely chopped ($0.30)
- 3 medium celery ribs, finely chopped ($0.20)
- 1 medium onion, finely chopped ($0.60)
- 1 medium red bell pepper, finely chopped ($1)
- 12 oz sugar snap peas, halved crosswise ($2.99)
- 1 tsp crushed red pepper ($0.05)
- 1/2 cup torn mint leaves ($0.68)
- sea salt ($0.05)

This recipe cost $6.27, so it wasn't exactly cheap for a side dish. But it did make a fair amount of vegetables and it was quite tasty. If you can find sugar snap peas that come out cheaper than $3.99/lb, then you can probably make it for less. In the end, not a terrible price, but not an everyday side dish.

Process:

We followed the recipe very closely on this one, other than not measuring olive oil and using different amounts of vegetables. (For details, the original recipe is here.)


The basic recipe is: heat olive oil, add soffrito vegetables and cook until softened, remove soffrito, add more oil and saute sugar snap peas until bright green, add soffrito, cook 2 minutes, add red pepper flakes + some water, cook a little longer, turn off heat, add mint + salt. Really easy and quick (other than the prep, since finely chopping vegetables took me quite a bit of time).

Review:


We really liked this recipe. The sugar snap peas came out nice and crispy, the red pepper flakes added a good zing, and the mint made it different from your average sauteed vegetables. I didn't notice until after making it that this came from the folks at Gjelina, a restaurant on our Los Angeles "to visit" list that we'll hopefully make it to someday. From this recipe, I can see why people love their dishes so much. We would make this again.

Week 10 - Australian

For Week 10 of the 52 week challenge, the theme was Australian. This was definitely going to be out of my comfort zone since most of the things we were interested in were meat pies and sausage rolls. Our meal for the Week 10 theme got delayed a little bit because (1) A was away on business that week and (2) I could only find puff pastry near us at ridiculously high prices. We shopped around for affordable puff pastry and then it was time to make sausage rolls (adapted from the recipe here)!

Ingredients:


- 1 lb sweet Italian sausage ($3.48)
- 1 yellow onion, finely chopped ($0.60)
- 2 cloves of garlic, minced ($0.10)
- 2 medium carrots, grated ($0.30)
- 1 medium zucchini, grated ($0.69)
- 1 cup breadcrumbs ($0.50)
- leaves of a small bunch of cilantro, finely chopped ($0.60)
- 1/2 tsp ground nutmeg ($0.05)
- salt and pepper ($0.10)
- 2 eggs ($0.38)
- 2 sheets of frozen puff pastry ($3.50)
- 1 tbsp sesame seeds ($0.10)
- sriracha sauce (to serve) ($0.10)

Dinner cost about $10.50, with most of the cost coming from the sausage and puff pastry. The puff pastry I got from Stop and Shop for $3.50 was the cheapest I could find anywhere (and it was on sale). It was almost double the price at Pathmark and almost double that price at Whole Foods. Unfortunately it's only a seasonal item at Trader Joe's and this is the off-season (I'm not sure what their price was, but theirs didn't have folded sheets, which is nice). I had no idea before making this that it would be so difficult to find affordable puff pastry! For some reason I thought it would be cheap.

Process:

1. In a large bowl, combine sausage, onion, garlic, carrot, zucchini, breadcrumbs, cilantro, nutmeg, salt and pepper. Beat one egg and add to mixture.


2. Preheat oven to 400 degrees. Line baking tray with parchment paper.

3. Unfold puff pastry sheets (if required) and cut each sheet in half. [Helpful hint: do not fully thaw your puff pastry sheets if they are folded. They will be very difficult to unfold, as you can see below. They may not unfold at all and you'll have to roll them out like pizza dough.]

4. Beat the other egg and brush the edges of the puff pastry sheets.

5. Place a portion of the sausage mixture at one end of the puff pastry sheet (not in the middle like in the photo). Roll up to enclose filling.


[Note: There was leftover sausage mixture after we rolled up all the sheets of puff pastry. The rest can become meatballs, burgers, etc.]

6. Cut each roll into smaller pieces (I cut 3-4 pieces for each half sheet). Place on baking sheet, seam side down.


7. Brush each roll with egg and sprinkle with sesame seeds.

8. Bake at 400 degrees for 20 minutes. Reduce heat to 350 degrees and bake for another 20 minutes, or until golden. [The original recipe had this at 400 degrees for 20 minutes and 350 degrees for 10 minutes, but after we tested one, it was still a little doughy, especially on the bottom, so we baked them for at least 10 more minutes.]


9. Top with sauce of your choosing (we picked sriracha).


Review:


From 2 sheets of puff pastry, we made 13 sausage roll pieces. I don't know how, but we ate 11 of them the night we made them. Completely unhealthy but the sausage mixture was pretty tasty. Italian sausage really makes recipes better.


The sausage rolls were a pretty successful experiment and the recipe tasted fairly authentic (based on our experiences here at Tuck Shop and Pie Face). I don't think I will make these again anytime soon since (1) finding affordable puff pastry was not that easy around here, (2) they are really bad for you, and (3) we could just go down the street to Pie Face to get affordable sausage rolls without making so many that we eat too much, but I'm glad they came out well.

Sunday, March 30, 2014

Pacific Flounder

I don't dislike the Trident seafood brand. They make delicious salmon burgers that have a permanent spot in our freezer. But I dislike (greatly) these Pacific flounder fillets we got at Costco. They were a really affordable price, but that was probably the only thing we liked about them.


They're paper thin, not meaty like they appear in the package photo. They have random bones, even though they claim they're boneless. They fall apart easily when cooked instead of staying together as a single fillet. They also smell and taste fishy, even though they weren't expired. And since they aren't vacuum sealed as individual fillets (and they are so small that it would be such a waste of packaging to do so), it made the entire freezer smell like fish every time we opened the bag (even after we put them in freezer bags inside the bag).

We love flounder. But we couldn't wait to finish this bag of fillets (which is finally done). Not going to buy these again. Do you have a favorite frozen fish from Costco?

Week 9 - Garlic

Week 9 of the 52 week challenge had a great theme - garlic! We love garlic. The only "problem" was that the week before, during the TV show inspired challenge, we made Hawaiian garlic shrimp which used three heads of garlic. I didn't want to make another dish that used a lot of garlic and would have such a similar flavor profile so soon after that glorious garlic dish. After giving it a little bit of thought, I found the perfect solution - I would try cooking with black garlic!


I first saw black garlic at Trader Joe's several months ago. I had been intrigued by it since then but I had no idea what to do with it so I didn't buy any until the week of this challenge. This was perfect for branching out and trying something new, the spirit behind how and why I'm doing the 52 week challenge. I looked online to see how other people used black garlic and was inspired by two recipes (here and here) to make my own black garlic and mushroom pasta.

Ingredients:


- 8 oz whole wheat pasta ($1)
- 8 cloves of black garlic ($2)
- 10 oz of white button mushrooms ($1.79)
- 1 large shallot ($0.33)
- 5 green onions ($0.55)
- 2 tsp soy sauce ($0.10)
- 1 tsp sesame oil ($0.10)
- salt and pepper to taste ($0.05)
- handful of chives ($0.45)

The whole dish cost about $6.37, which isn't bad for dinner for two. The most expensive part of the meal was the black garlic. I don't know if the Trader Joe's price is on par with other black garlic vendors since I haven't really seen it elsewhere.

Spotlight: Black Garlic

The entire package of black garlic at Trader Joe's cost $2.99 for a little under 2 oz of garlic. The garlic is black because it's fermented, which gives it a much sweeter and milder flavor than regular garlic. Some people say that the flavor reminds them of balsamic vinegar, but the earthy umami flavor reminded us more of the fermented black beans we use in Chinese cooking (like in the black bean chicken dish we love).


One thing that surprised me was how soft the garlic was. I figured fermented garlic would be softer than regular garlic (since the same is true of the black beans), but I didn't expect it to be this soft. Some of the sites I read said to make sure you cut black garlic with a sharp knife. It's good advice as many of the cloves were so soft that they could have easily turned to paste on the cutting board.


We used 8 cloves of garlic in this recipe, which was about 2/3 of the package we got from Trader Joe's. It gave the recipe a good amount of flavor.

Process:

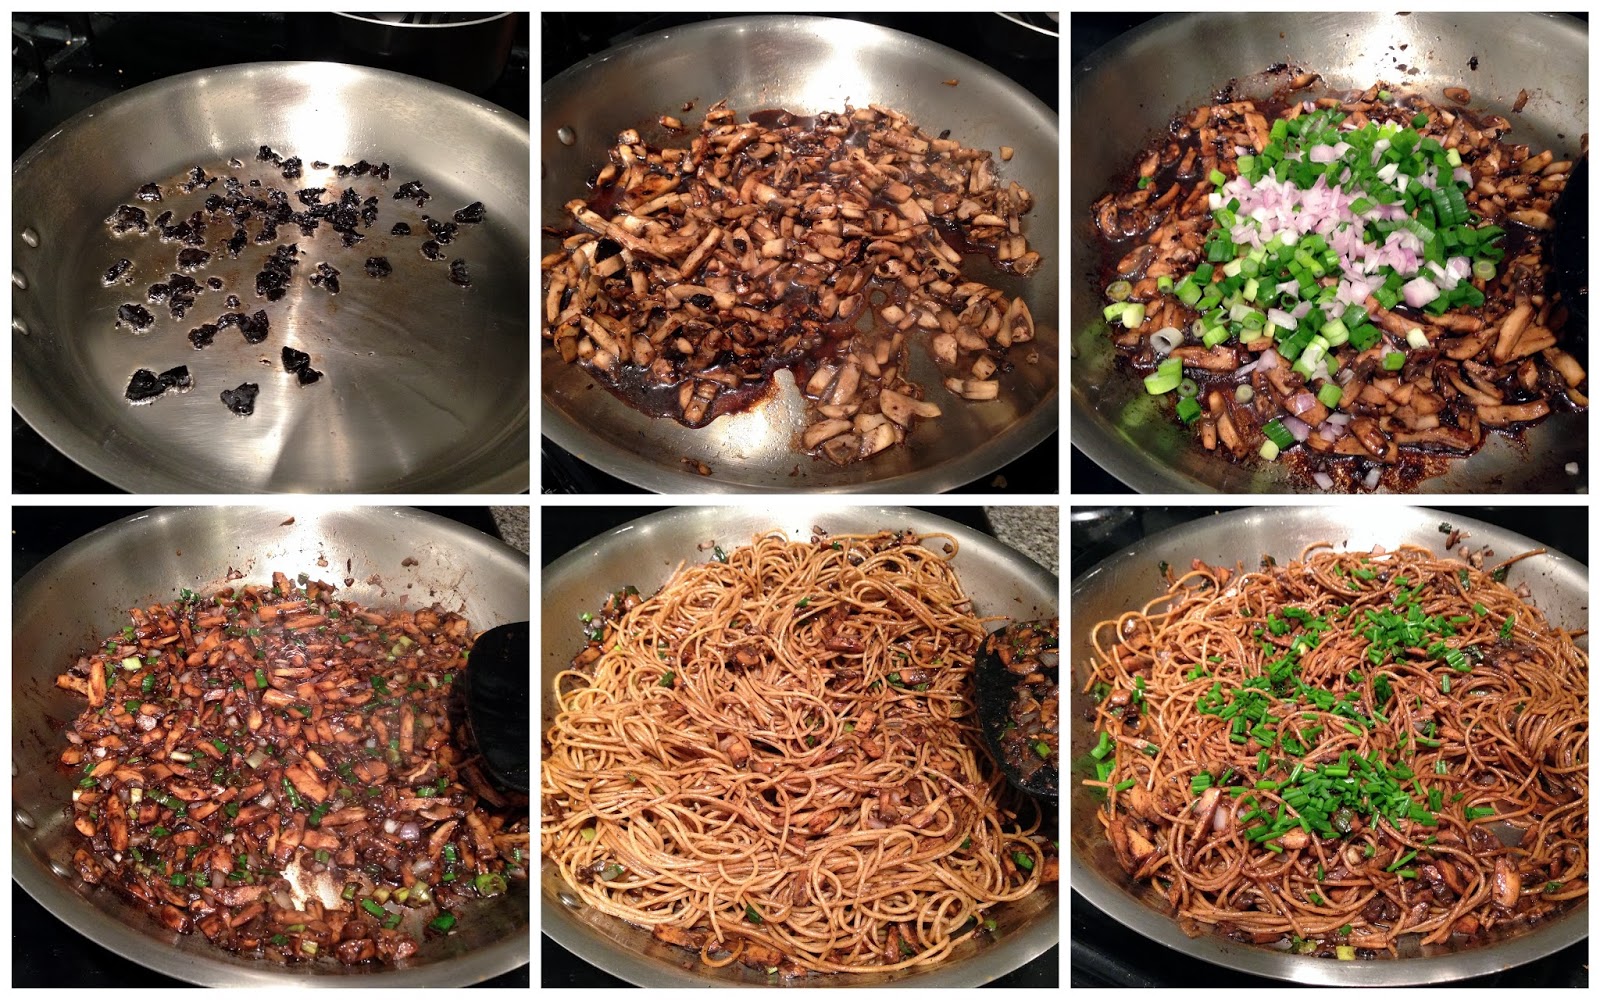
We cooked the spaghetti in its own pot and then got to work sauteing everything else. First the black garlic until fragrant and a little fried, then the mushrooms until they softened, and then the scallions and shallots until they were also a little softened.


Once everything was softened and the flavors were combining, we added the spaghetti, mixed it all together, then added the soy sauce, sesame oil, salt and pepper. Once everything was sufficiently mixed and heated up, and the flavors had time to combine, we turned off the heat and added the chives as a garnish. It was really easy and the prep was not that time consuming either, which was a plus.

Review:


The pasta with black garlic and mushrooms had a really nice flavor, most of which came from the mushrooms and black garlic. Mushrooms seem like a good match for the black garlic flavor. Although I thought the black garlic was good, I wonder if we could just use fermented black beans and regular garlic for a similar (or better) flavor result. I was glad we experimented with black garlic for the first time. Now I just have to figure out what to do with the rest of it!

Saturday, March 29, 2014

Sesame Chicken Cucumber Noodle Salad

The second dish I made for poaching week was a sesame chicken cucumber noodle salad, adapted from this Eating Well recipe. I had collected a lot of recipes over the months that included pre-cooked chicken as an ingredient, but since we don't live close enough to Costco to have rotisserie chicken on a regular basis (and the grocery store rotisserie chicken always looks awful), we never have any leftover cooked chicken. Poaching week was a good excuse to learn how to poach chicken for those types of recipes.

Ingredients:


- 3 bunches (about 9 oz) of buckwheat noodles ($2.50)
- 2/3 cup creamy peanut butter (should have been more but we ran out) ($0.50)
- 3/4 cup rice vinegar ($0.60)
- 2 tbsp toasted sesame oil ($0.46)
- 2 tbsp shaoxing wine ($0.10)
- 1 cup thinly sliced scallions ($0.43)
- 2 tbsp light soy sauce ($0.10)
- 2 tbsp sriracha ($0.15)
- 1 bag of chopped romaine salad ($1.99)
- 2 chicken breasts ($2)
- 2 red bell peppers ($2)
- 1 large cucumber ($1.69)
- salt and pepper to taste ($0.10)

At approximately $12.60, it was not a cheap recipe but considering it made about 6 servings (big dinner for two plus lunch for two days for me), it's not too bad (about $2.10 per serving).

Process:

1. Poach chicken (method here).


2. Cook noodles until just tender (about 6 minutes for dry noodles). Drain and run noodles under cold water (or transfer to ice water). Transfer drained cold noodles to large bowl and set aside.

3. Prep everything else - thinly slice scallions, dice peppers, cut cucumber, cut chicken into bite-size pieces.


4. Make dressing - whisk peanut butter, vinegar, sesame oil, shaoxing wine until smooth. Add scallions, soy sauce and sriracha and stir to blend.


5. Cut or tear romaine into smaller pieces and add to the bowl with the noodles.

6. Add chicken, bell peppers and cucumber to the noodles, and mix everything together.


7. Once well-mixed, add most of the dressing and toss to coat.


8. Add salt and pepper to taste and the remaining dressing if desired. (We liked the dressing so we used it all.)


Review:

This was one of my favorite February recipes. A really light and healthy salad which got even better as lunch leftovers as the flavors melded more overnight. It was a nice break from the usual heavier and heartier soups and stews that characterize winter recipes. It was also a fairly quick (compared to some others) and straightforward recipe.


The salad was salty, sweet and a little spicy from the extra sriracha we added. It felt really light from the raw cucumbers, peppers and lettuce. Although the chicken was a little overcooked during the poaching (see here), you couldn't tell at all once it was in the salad and it wasn't dry at all. The star of the salad was the excellent dressing. This would be a wonderful salad dressing for any Asian-themed salad. We would definitely make this again.

Poached Eggs and Polenta

For the first part of the Week 7 poaching challenge, I made poached eggs with polenta (and a side of mushrooms), loosely adapted from this Serious Eats recipe. The main difference between our dinner and that recipe was that I didn't make the polenta cakes from scratch. It was quicker and more convenient to use a tube of pre-cooked polenta. Although I'm sure the from-scratch polenta cakes would be tasty, sometimes you just need to take a shortcut.

Ingredients:


- 4 eggs ($0.70)
- 1 tube of polenta ($1.99)
- handful of chives ($0.42)
- a few tsp of rice vinegar ($0.15)

At $3.26, this was really affordable. Cheaper than the mushroom side dish we made that night! And we had some polenta left over for another day.

Process:

The polenta was easy, since I chose to not make the polenta from scratch. I just sliced the tube into rounds and pan-fried them for a few minutes on each side until they were golden.


Next, I poached the eggs. (For details on the egg poaching, see the Week 7 technique post here.)


To finish off the dish, I topped everything with some finely chopped chives.


Review:

We really liked the polenta cakes with poached eggs. We've always been big fans of the pre-cooked polenta from Trader Joe's and the poached eggs were the perfect accompaniment.


I had never really had poached eggs before making them for dinner. Turned out that I liked them more than I thought I would. Would definitely try making this again, with or without the polenta.

Friday, March 28, 2014

Black Sesame Citrus

One of the more interesting custard flavors this month at Shake Shack is black sesame citrus. Black sesame is one of our favorite ice cream flavors (we've had some fantastic scoops at Chinatown Ice Cream Factory and Sundaes & Cones) and we hoped this custard would be great too.


M's thoughts:
My first spoonful of this custard had two distinct tastes - black sesame and a yuzu-like citrus flavor. After the first spoonful, however, all I got was the citrus and some floral flavor with a (very) light undertone of sesame. The citrus definitely overpowered the black sesame for me and I was hoping that the black sesame would have a stronger presence. I think in the future I would rather stick with plain black sesame ice cream.

A's thoughts:
I was really hoping that this would be a really heavy black sesame flavor similar to Chinatown Ice Cream Factory, but it was really really mild. My first bite was mild black sesame with a small hint of citrus. The rest of my bites didn't really have any major citrus flavor at all except for maybe some of the melted part at the bottom. This wasn't my favorite flavor, and I really had some high hopes for it.

Black Sesame Citrus
A's rating: 6/10
M's rating: 6.5/10

Thursday, March 27, 2014

Week 7 - Poaching

We're in the middle of Week 13 of the 52 week challenge, and I really need to catch up on my challenge posts since I'm still back on Week 7! The theme for Week 7 of the 52 week challenge was poaching. I have always wanted to learn how to poach eggs, and thought I would try to make the most of this challenge by poaching both eggs and chicken for the first time.

First, poached eggs. The plan was to make a poached eggs and polenta dish (post forthcoming). I found lots of different methods for poaching eggs in my research, but the two that I thought were most feasible for me to try were from Simply Recipes and Smitten Kitchen. I decided to try both, making 2 eggs using each method.


Clockwise from top right: eggs ready to be poached, poaching process, imperfect finished products

First I followed Simply Recipes, dropped the egg into the hot water and used a spoon to try to keep the egg whites with the yolk. That didn't work all that well for me. The whites didn't stay anywhere near the yolk and just disintegrated all over the water. The Smitten Kitchen method that I tried second seemed more promising since you create a "whirlpool" and then drop the egg into the middle of it. That technique did work better for me (even though I made different rookie mistakes with those eggs, like forgetting the vinegar and letting them cook too long). Lesson learned: next time use the Smitten Kitchen method, remember the vinegar and don't overcook the eggs. Another thing I learned from the egg poaching experiment: I like eggs more than I thought I did.

Second, poached chicken. It's the perfect way to cook chicken when you are going to use it in a recipe that requires already-cooked chicken but doesn't need browning or additional flavors in the cooking process. I decided to make a pasta salad using the chicken (post on this also forthcoming).


Left to right: uncooked chicken, chicken mid-poaching, chicken finished

I followed this guide from the Kitchn and it was really easy, although perhaps I should have been a little more attentive as I did let the chicken overcook a little bit. Basically you put the chicken in a pot with some salt and pepper, cover it with cool water by about an inch, bring the water to a boil, reduce the heat to low, cover the pot, let the chicken simmer for about 8 minutes, and then check the temperature. When it reaches 165 degrees in the thickest part, it's done. I started checking the chicken around 8 or 9 minutes, and it was definitely done. Unfortunately it was overdone and when I tried to use forks to pull it apart, thinking it would shred like chicken does when it comes out of a slow cooker, it was too tough and I lost some of the chicken to the floor. Although it was a little overdone, it worked perfectly fine in the salad recipe that I used it in, and you could barely even tell that it cooked a bit too long.

I'm really glad that I learned how to poach eggs and chicken and I'm determined to get a perfectly poached egg done at some point. I like that this challenge means I get to learn new techniques that are useful!

Saturday, March 22, 2014

Pi Day with Uncle Mario

Last Friday was March 14th, which meant it was Pi Day! We always try to make it out for dinner on Pi Day to grab some pizza to celebrate. Unfortunately our favorite neighborhood pizza spot had a line out the door by the time we arrived, so we went in search of another pizza joint. We ended up at Uncle Mario's, a Hell's Kitchen restaurant that we've walked by many times but have never visited.

A ordered a Peroni to relax after a long, hard week of work. As a beer it's not his favorite. He prefers bolder flavors and beers like IPAs, stouts, and porters. It was a refreshing enough beer, though.


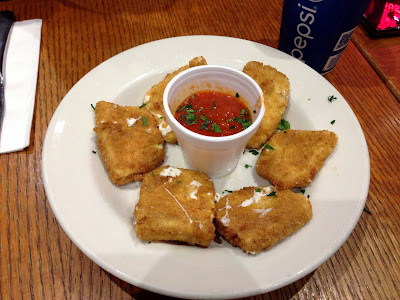
We were pretty hungry and we figured that a fried appetizer would arrive much more quickly than a wood-fired pizza. So we ordered the fresh mozzarella fritte (lightly breaded ovoline medallions served with Uncle Mario's marinara sauce, $7.50).


The cheese itself was mild, but that's expected in fried cheeses. The sauce was full of flavor, and it made us excited to see what the pizza would be like. Fried cheese isn't the healthiest of appetizer options, but we always love eating it. It was little expensive for what it was (the whole menu was), but it was a good start and something we wouldn't make at home since we don't deep fry.

For our pizza, we opted for the Original Grandma special pie (thin crust square pie topped with fresh mozzarella and secret tomato sauce on a garlic bread crust, $22). We did realize during dinner that we were out celebrating Pi Day and did not get a round pizza, but in the end pie is pie.


If we were eating this pizza without the benefit of the menu description, we would probably think it was pretty good. The tomato sauce had good flavor and was rich with tomatoes and garlic. The fresh basil and mozzarella that topped the pie were good. The dough was pretty good, with a crispy crust and nice chewy inside pieces. Overall, it wasn't our favorite pizza, but it was pretty solid.

However, we were expecting a lot more, mostly from the crust. The menu said it was supposed to have a "garlic bread crust" so the first thing M did was cut off a piece of the crust by itself to try it. She expected it to taste like garlic bread. Like the stuffed crusts in all those pizza commercials on TV, she thought it would taste like garlic and butter and herbs. But it didn't. It was regular crust. Eating the pizza, you definitely tasted garlic, but it seemed like it came from the tomato sauce and had nothing to do with the crust. Not having a garlic bread crust was kind of disappointing. We also felt a little cheated since it was advertised as a special garlic bread crust and ended up being just a regular dough. It was part of the reason we thought the pie would be so special and why we ordered it.

We had a nice, relaxing Pi Day dinner at Uncle Mario's but it certainly hasn't replaced our favorite pizza spot in the area, Don Antonio (we're still working on a post about that one which we will hopefully share soon). Happy Pi Day!

Thursday, March 20, 2014

5 Napkin Burger

Some of the most crowded burger spots in NYC include branches of the 5 Napkin Burger mini-chain. We've been going there for years and have even endured hour-long waits in order to get a table (even though we're not really fans of waiting anywhere). We usually frequent the original branch as it's the closest to us and the one we've been going to since they opened. It's always packed, there are almost always lines out the door even at off-peak hours (although it's gotten a little better as they've opened more branches), and they can usually be counted on for a good burger.
We went out looking for a late weekend lunch on a recent weekend and were surprised to see that there were actually tables at 5 Napkin Burger. It had been some time since we've visited since we've been eating out less, so we decided to stop in. A got a different burger than usual, the avocado-ranch beef burger, while M decided to go for one of her old favorites, the Italian turkey burger.

Italian turkey burger with fries

The Italian turkey burger ($13.95) tops an herb-filled turkey patty with melted mozzarella, spicy tomato sauce, and vinegar peppers, and loads it all on a sesame brioche roll. At least that's what the menu says it should have. In the past, the description was pretty accurate. There used to be a zesty flavor from the tomato sauce, sourness from the vinegar peppers, lots of flavor from the turkey patty and the herbs and seasonings, richness from the melted cheese, and a soft pillowy bun. 

Cross-section of the Italian turkey burger

This time, it was all just kind of bland. It made M wonder if they were coasting on their reputation now and not putting as much effort into their burgers. It was just so different from her memory of the last Italian turkey burger she got there. The turkey burger itself, from its appearance, looks like it's filled with herbs and seasonings, but it was boring and relatively flavorless. Although many people think all turkey burgers have no flavor, M isn't one of those people and she genuinely enjoys turkey burgers. But this one tasted like nothing. The peppers were fine, but that was the only good topping. There was barely any cheese or tomato sauce, and the tomato sauce that was there was neither spicy nor zesty. The bun was fine. But the best part of the whole plate was the bowl of fries.

A's avocado-ranch burger ($14.95) consisted of an 8 ounce fresh ground beef patty, pepperjack cheese, guacamole, lettuce, tomato, and ranch on a sesame brioche roll.

Avocado-ranch burger

A wasn't sure what to expect oddly enough. He read the description but didn't know how the flavors would pair together. The pepperjack cheese was very muted and didn't have that much flavor. The guacamole was nice and creamy, but it was also overpowered by the ranch dressing. In fact, A thought the entire burger was overpowered by the ranch dressing. It tasted like beef and ranch. That's not to say that's a horrible thing, but the other ingredients couldn't make an impact, and that's disappointing.

Assembled avocado-ranch burger

We did enjoy the fries. They were skinny, crispy and salted just the right amount. We were so hungry by the time our food came (the service was awful and we felt really neglected as our lackadaisical and frequently MIA waiter was barely around, unlike most of the other servers we watched) that we just dove right into the fries. Good thing they were tasty.

Delicious basket of fries

Although we've had good experiences at 5 Napkin Burger before, we probably won't return anytime soon. There are so many good places to eat in the city (and other good, more affordable burgers) that we don't feel the need to go back to a place where it seems like both the food and service have headed downhill. It's probably not going anywhere so maybe sometime down the line we'll go back, but not in the near future. For now, we would rather go one block further to Bareburger.

Southern Greens

We've been trying to make an effort to incorporate more greens into our diet lately, which has meant many bags of kaleidoscope chard from Trader Joe's. This time I decided to buy something new - the Southern Greens blend of mustard, turnip, collard and spinach greens. It cost $3.49 for the 16 oz bag, only a couple cents more per ounce than the chard we usually get.


We braised the greens with some tomatoes, garlic, chicken broth and spices. It took about 30-40 minutes to get the greens soft enough to eat. The greens were really tasty and so healthy.


One big difference is that the Southern Greens are more bitter and peppery than the chard. It's nice to change up the greens every once in a while, but we'll probably stick with the chard as our go-to green.

Buy Again? Sure, whenever we're looking for a break from our usual spinach, baby kale or chard.

Monday, March 17, 2014

Golden Jewel Blend

Last week I went to grab a jar of artichoke hearts from the back of our cabinet and discovered this box of Golden Jewel Blend grains from Wegmans lurking on the shelf. It expired back in January since I forgot about it, but that certainly wasn't going to stop me from using it. The combination sounded so interesting.


The Golden Jewel Blend (which according to this is manufactured by a company named Indian Harvest) contained a blend of Israeli couscous, tri-colored orzo pasta, split baby garbanzo beans and red quinoa.


We usually don't find quinoa to be a very distinctive grain. It's healthy but it's kind of just there. That's true here too. The flavor and texture in this grain blend instead comes from the Israeli couscous (one of my favorite types of grain), the orzo (which adds wonderful color as well), and the crunchy harder garbanzo bean pieces. The Israeli couscous was the star of the dish and tied it all together.


We liked this grain blend and it's very easy and quick (about 15 minutes) to make. At $3 a box, it's not that cheap but it's a great meal accompaniment and a nice change from just eating rice.

ETA: I was at Trader Joe's the day after I posted this and found this Harvest Grains Blend, which looked remarkably similar to the Golden Jewel Blend. I don't know if it's made by the same manufacturer, but it has all the same ingredients in a larger bag for a slightly lower price. (Turns out I had a bag of this at home already but forgot.) If you're like us and you don't live near a Wegmans but live near a Trader Joe's, looks like you can pick this up too!

Chelo's Hometown Bar and Grille

In my first few trips to Rhode Island, I was with a less-than-adventurous eating coworker. We never branched far from a couple regular places. This time around, I was with a coworker that was willing to check out new places so M and I did some research for my second week away. On our list was Chelo's Bar and Grille which is a chain restaurant located all around Rhode Island. They offer traditional favorites like burgers, salads, and sandwiches, but they also specialize in local, New England fare. Being in New England, and hearing M lament that she wouldn't be able to eat any of these, I figured I had to try out these specialties. When my coworker and I got there, I was starving.

Clam Cakes and Chowder 

I started out with an order of their clam cakes and chowder. The appetizer comes with 3 of their clam cakes and a cup of their clam chowder as well. They give you the option of red, white, and Boston. I really really like New England clam chowder so I had to go with the white.

Clam Chowder 

It's not the greatest picture, and I apologize for that, but this was a tasty chowder. It's not the best I've ever had, but it was a very solid offering. Not too salty, just the right creaminess, and full enough of clams, potatoes, and vegetables to not be thin while not being dominated. They also add a bit of bacon for that smokiness, but it's controlled so as to not be the overall flavor of the soup.

Clam Cakes 

I wasn't really sure what to expect when it came to the clam cakes. I had never had them before and envisioned something to the effect of a crab cake but made with clams instead. My best explanation for these is that they're like hush puppies with some added chopped up clams. They're a little doughy, they're a touch salty, and they're fried up really nicely. The bits of clam give it a little chewiness and texture as well. The clam cakes were really interesting, and I enjoyed dunking the pieces into the soup.

I probably could have stopped after the appetizer, though, as the clam cakes and chowder were actually quite filling. However, having eyes much larger than my stomach when I walked in, I also opted to order their baked scrod entree which is another New England specialty.

Baked Scrod 

The dish comes with a side of rice pilaf and broccoli, but who cares about that? This is all about the fish! The baked scrod is seasoned with wine and herbs, topped with cracker crumbs, and then baked in a dish that is literally full of butter. I enjoyed the fish with and without the squeeze of lemon that they provide. The fish itself was a little overcooked, but the butter kept it mostly moist. Overall this was an okay dish, but it certainly took a backseat to the clam cakes and chowder. After stuffing my face in the worst (best?) way possible, I was informed that my entree came with a free dessert as well. Thankfully, the waitress said I could take it to go so I got a slice of their chocolate creme pie.

Chocolate Creme Pie

Contrary to the name, it's not a cream based pie. This is chocolate pudding layered into a pie crust and bombed with whipped cream. The crust is a bit hard and tough to cut through with a plastic fork, but the chocolate pudding was really nice. It was more solid than normal pudding since it had to be used for pie filling, and it wasn't overly sweet. It had a nice, subtle cocoa flavor. I didn't eat all of the whipped cream since that's just an absurd amount. The pie itself was good overall but not spectacular.