Saturday, April 16, 2016

Week 13 - Bread

I wasn't that excited about the Week 13 bread challenge. The idea of making bread from scratch in our cramped kitchen with tiny counters wasn't really that appealing. A sent me some suggestions for breads that might work for the challenge and for dinner, and I found one in that batch that was perfect - this spicy Italian sausage and cheese bread from Emeril. The base of the "bread" here was actually pizza dough, and you could use store-bought instead of homemade dough, so that was much more convenient. It may not have been making bread and dough from scratch, and instead was more of a stuffed bread, but it sounded good to me for the challenge meal.


The ingredients for the challenge were:

- 1 package of garlic and herb pizza dough ($1.19)
- a few tbsp of cornmeal ($0.20)
- olive oil for sauteing ($0.20)
- 1 lb sweet Italian pork sausage, removed from casings ($4.36)
- 2 small onions ($0.40)
- 4 garlic cloves ($0.08)
- red pepper flakes ($0.03)
- 1/2 bunch of basil, leaves chopped ($1)
- 1/2 bunch of parsley, leaves chopped ($0.50)
- a couple of cups of shredded mozzarella ($2)
- 1 egg, beaten with 2 tsp water ($0.17)

The total for the recipe was approximately $10.13 ($13.67 when you include the mushrooms we ate on the side). It made enough for us for dinner plus a couple pieces of bread left over for lunch/breakfast, so not too bad. Could have been cheaper though if we shaved some costs on the herbs. (More on that later.)


The first step was to cook all of the "filling" for the bread. After doing the prep work (chopping the onion, garlic, basil, and parsley, as well as some mushrooms that we would eat on the side with the other half of the herbs), all of the filling ingredients got sauteed in a large skillet. First up were the Italian sausages, which we broke up while they cooked. Next was the onion, followed by the garlic and a few shakes of red pepper flakes. When all that was ready, the pan came off the heat to cool for a little bit, and then I stirred in the basil and parsley and let it sit. Luckily A was able to help me with this step so I was able to keep prepping vegetables and herbs while he worked at the stove.


The next step was to get the dough ready (which had been sitting out at room temperature for a little bit per the package instructions). I set the oven to preheat at 375 degrees and spread some cornmeal on a baking sheet. I also added some cornmeal to a large cutting board and worked on rolling out the pizza dough. We've been making pizza for a few years now but still don't have a rolling pin, so I basically flatten the dough using my hands. I couldn't get it to flatten out to the size I wanted and it was a little thick in some spots, but I figured it would be okay.


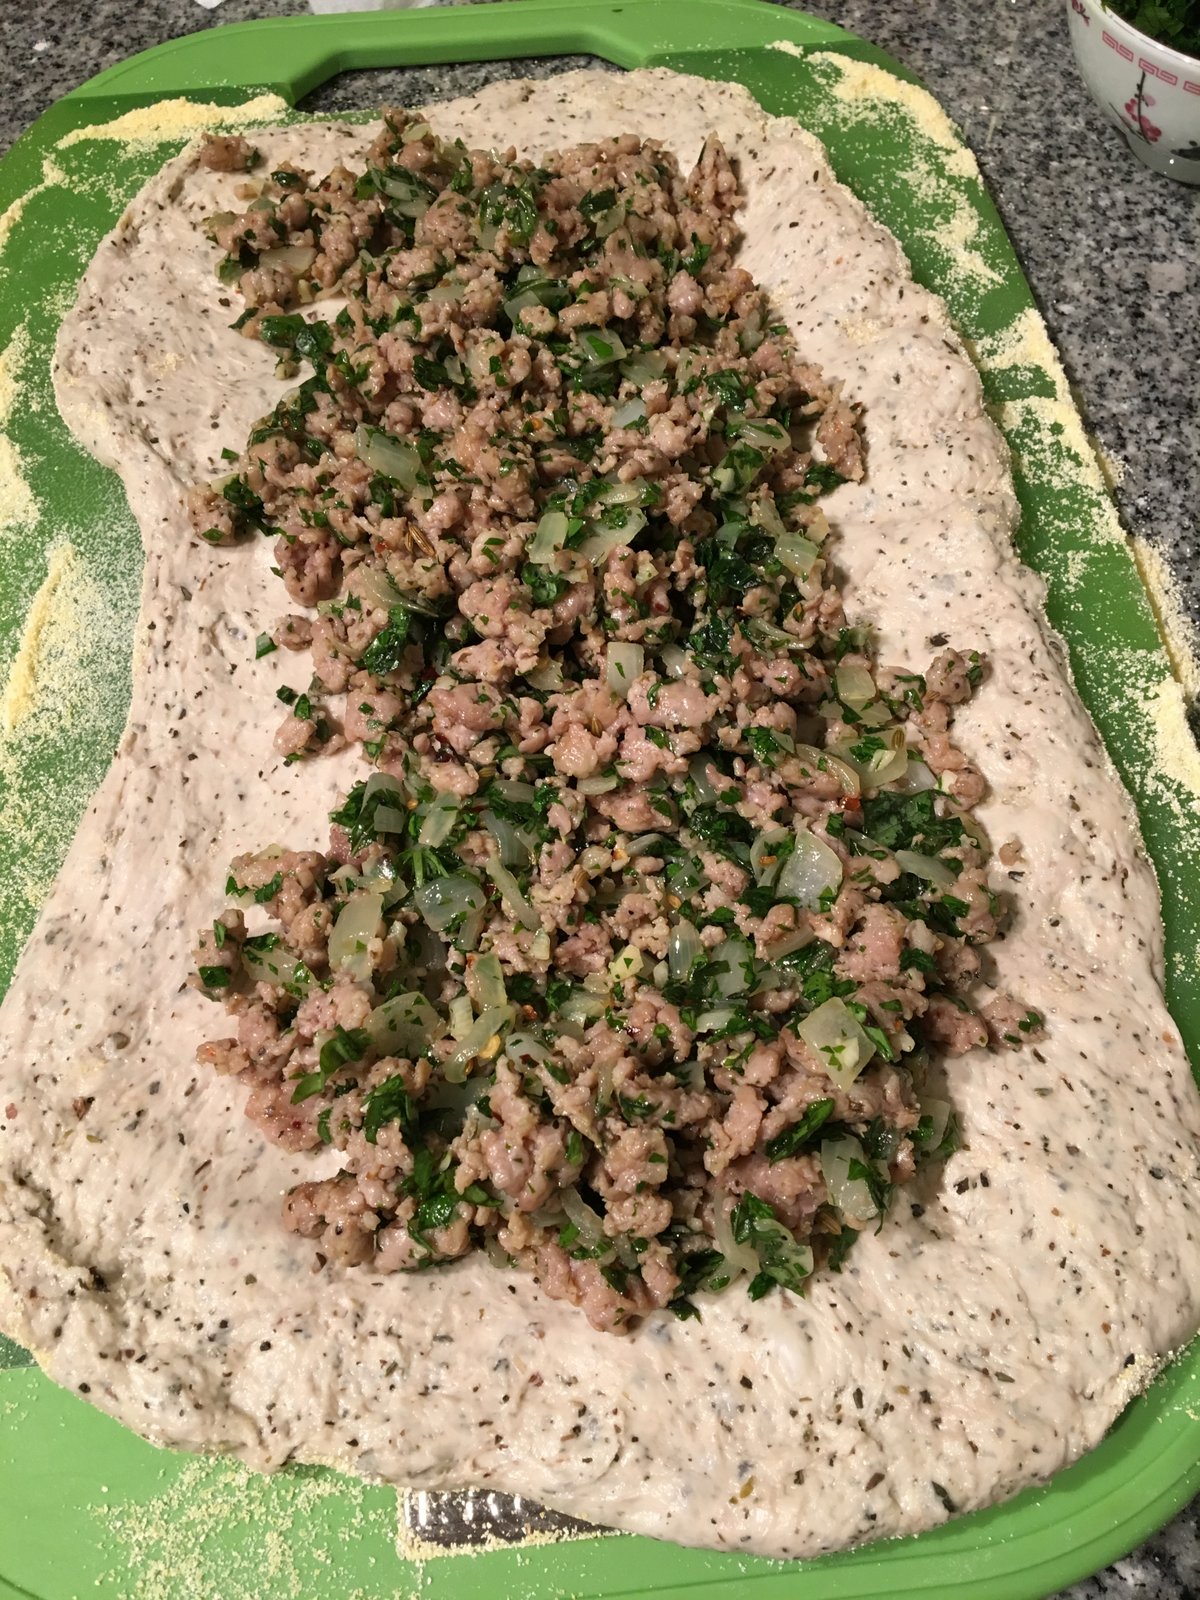
Once the dough is rolled out, the sausage mixture gets added on top, leaving about an inch empty on all sides. The sausage mixture then gets topped with cheese. (Note that I don't know exactly how much cheese we used, since I had frozen a bag of shredded mozzarella that we used for something else and just thawed it out for this.) At some point before this, we prepared the egg wash (the beaten egg plus water), and I brushed that along all the edges in preparation for the rolling step.


The recipe instructions noted that you were supposed to roll it from the long side like a jelly roll and pinch the ends in as you rolled it along. For the most part, it worked. But there were a couple of places where the dough was too thin and broke open under the weight of the filling. We tried as best we could to patch those up, but once you've already rolled it, it's kind of hard to do that. My fault. Once it's rolled, you brush the entire thing with the rest of the egg wash, then transfer it to the baking sheet with the seam side down, and bake it for about 40 minutes until it's golden brown.


It was pretty late by the time I finally got the bread into the oven, so our "side dish" of sauteed mushrooms turned into an appetizer of sauteed mushrooms with herbs and garlic. At least we got to eat something while we waited for the bread.


When the bread came out of the oven, I was so surprised that it actually looked like bread. I'm not really sure why since the starting point was pizza dough, and that's really just bread in another form anyway. If it hadn't had the holes in it, it would have absolutely looked like a loaf of bread. In those spots, some of the filling and cheese had spilled out of the bread, ruining its look, but at least it didn't adversely affect the taste or texture in any way.


We sliced up the bread after letting it sit for about 10 minutes, and were pretty impressed with how well it held together. Overall, the entire thing was better than we had expected it to be. The taste of the Italian sausage was great, and the garlic and herb dough (which I think had basil, oregano, and garlic in it) was quite complementary to the flavors in the filling. The only not great things we could find about the recipe were (a) that it was a little more doughy on the bottom and the sausage seemed to fall in a single layer despite trying to roll it like a jelly roll (although the "bready" part was good too, which means that this pizza dough is quite good), and (b) that the basil didn't really come through much once the filling was loaded into the bread with the cheese (as compared to when I ate it out of the pan), and since it wasn't the predominant flavor in the filling, dried basil probably would have worked just fine. Those are pretty minor though, since the bread was really good.


It took a couple of hours to get this bread finished, but it was worth the effort. We liked it and would definitely make it again, although we might put more vegetables in the filling for a more balanced meal. Also, while I love the smell and taste of fresh basil, I'd probably just use the dried basil in the future and save some money, since it probably won't make a huge difference. This was a really good bread and I'm glad that A found it and that we tried it!

Friday, April 15, 2016

Fish'wich

I'm not sure what's going on over at Lenwich (formerly Lenny's), but lately I just haven't been as into their sandwiches as I used to be. I loved their crack jack turkey sandwich in the past, but then they raised the prices and added a new sauce that didn't enhance the flavors of the sandwich at all. I've tried to find a new favorite since (to me) that one isn't as good as it used to be, but so far nothing has stuck. I was hoping that maybe I'd find a new favorite in the fish'wich that I tried recently.


The fish'wich came on a brioche bun, and consisted of a crispy cod filet, cole slaw, kettle chips, pickle, lettuce, tomato, and tartar sauce for $8.99. I'm a big fan of fish sandwiches, but this one was just okay. The flavors were mostly mild, nothing really stood out in the batter for the fish, and all of the components separately tasted better (and more distinctive) than they did together. It was also a bit of a "tall" sandwich which made it hard to bite, and all the different parts came tumbling out instead of sticking together for a composed sandwich. Given the choice, I'd probably go for a filet-o-fish from McDonald's instead (although admittedly I'm a fan of the filet-o-fish, nostalgic pleasure), since the taste of the fish'wich I got wasn't really any better and it's double the price. Still searching for a new favorite...

Inside the Mac

As we've been doing our reviews of recent Trader Joe's products, it occurred to me that a lot of the products we use for challenge meals often go unreviewed. Many of them are pretty basic staples, so a good way to tackle them seemed to be a group post about all the ones we used during that particular challenge. First up, stuff from the Week 12 mac and cheese challenge.


Product: Japanese style panko breadcrumbs
Price: $1.79
Quick review: We've used this panko quite a bit, and it seems to last for a while. I don't know if other panko breadcrumbs have more flavor as these have basically no flavor, but they work for breading.
Buy Again? Sure. It's convenient to pick up when at TJ's, and I don't really have much basis to know how this ranks against other ones.


Product: Wisconsin sharp cheddar cheese
Price: $4.99/lb
Quick review: This was our first time getting this particular cheddar cheese. Pretty good price. Definitely much cheaper to buy a block of cheddar and grate it ourselves than to buy the pre-shredded stuff, even if that's more convenient. (Glad A was around to grate the cheese while I did other prep work.) Wasn't as sharp in flavor as we thought it would be though.
Buy Again? Maybe, if we're looking for cheese to grate for a dish, but on its own, probably not. It was okay, just more mild than we were expecting.


Product: Uncured apple smoked bacon
Price: $4.49
Quick review: If you've been following challenge posts over the past couple of years, you've probably seen this bacon a lot. It's my favorite bacon to use, very good quality, pretty decent price. When they don't have it and I need to pick up bacon, I'm very sad. Whole Foods is more expensive, and the TJ's bacon ends and pieces, while fine, aren't as good as this one. Great smoky taste and flavor. The whole apartment smells glorious for the rest of the night.
Buy Again? Yes, definitely, absolutely, without a doubt.


Product: Vegetable radiatore
Price: $1.99
Quick review: I've wanted to buy this for a long time since radiatore is one of my favorite pasta shapes, but I held off because we had so much pasta at home already. However, for the mac and cheese, since TJ's doesn't carry elbow macaroni and I wanted something with ridges that would hold the cheese sauce well, this was perfect. On top of that, there was some spinach, beets, and red bell pepper in there since it was vegetable radiatore. I love vegetable pasta.
Buy Again? Yes. I just have to finish more of the pasta at home first.


Product: French thyme (dried spices)
Price: $1.99
Quick review: I love thyme, both fresh and dried, and the TJ's spice shaker seems like pretty good quality dried thyme. We use this a lot.
Buy Again? Yes.

Clearly I forgot to take pictures of the beer and butter for this post, but at least a few more products are now reviewed so we won't forget we've tried them!

Thursday, April 14, 2016

Week 12 - Mac and Cheese

While we love mac and cheese, we had never actually made homemade mac and cheese before the Week 12 challenge. Most of the time, we usually did something semi-homemade using boxed mac and cheese and adding other stuff in for an easy dinner. For the challenge, I decided to use this recipe for garlic, bacon, and beer mac and cheese from Erica's Recipes as a starting point, since it sounded so good. Since there weren't a whole lot of vegetables in the mac and cheese, I decided to use up the rest of the bacon and make a side dish out of asparagus and the leeks from last year's Week 44 challenge. Seemed like a good way to welcome spring.


The ingredients for the mac and cheese (adapted from the original) were:

- 7 strips of bacon ($2.62)
- 4 tbsp butter, divided ($0.37)
- 3 tbsp flour ($0.15)
- 5 cloves of garlic, minced ($0.10)
- dried thyme (didn't measure but added a fair amount) ($0.20)
- 2 cups milk ($0.57)
- 3/4 cup oatmeal stout beer ($0.59)
- salt and pepper ($0.05)
- grated sharp cheddar cheese (about 2 cups) ($2.79)
- vegetable radiatore ($1.99)
- 1/2 cup panko breadcrumbs ($0.30)

The total for the mac and cheese was approximately $9.73. Adding in the side dish with the rest of the bacon, some mushrooms, leeks, and asparagus (along with butter, salt, pepper, and thyme for seasonings), the total for the entire meal was approximately $16.93. Not a very cheap dinner, but not the most expensive challenge meal we've had.

I'm not going to go through the entire process of making the leeks again since it was pretty much the same as last time except that I added some asparagus in too. The one thing that it did do was make cooking that night much more complicated. There was a lot more prep thrown in (slicing bacon, washing and chopping asparagus, washing and chopping mushrooms) because of the vegetables, and also a game of musical burners since our kitchen isn't really that large and there were a lot of moving pieces at once. By the end of the night, I had used up 3 pots, a large pan, a baking dish, and a frying pan, in addition to 2 cutting boards, the cheese grater, and a countless number of prep bowls. It was definitely a big project.


As far as the steps to make the mac and cheese, what we did was:

1. Bring water to a boil in one pot. Fry the bacon strips, then set aside to cool and crumble. Mince garlic. Grate cheese. (Thankfully A was able to help me because of all the prep work to be done. Another set of hands was hugely appreciated.)

2. In another medium sized pot, melt the butter and add the flour over medium heat. Stir until it bubbles and cook for a couple of minutes. Add garlic and thyme, and cook for another minute, stirring the entire time.


3. Slowly add in the milk and beer. Stir until everything is mixed well together, but don't let it boil.

4. Lower heat to medium low and add cheese with salt and pepper. Stir until the sauce is smooth. (This sounded like a quick process in the recipe, but took at least 10 minutes for all that cheese to melt for us. There was just a lot of stirring in this part of the recipe.)

5. Once the sauce is smooth, remove from heat and add half of the crumbled bacon.


6. While making beer cheese sauce, cook the macaroni al dente.

7. Once the macaroni and beer cheese sauce are both done, pour cheese sauce over macaroni. (The recipe did this the reverse way, but our pasta pot was larger than our beer cheese sauce pot, so it made more sense to do it this way.)


8. In another pot, add 1 tbsp of butter with the panko, more thyme, and the rest of the bacon. Stir and cook for a couple of minutes.


9. Add macaroni and cheese sauce to baking dish. Sprinkle the bacon-panko mixture on top of the macaroni.

10. Bake at 350 degrees for 25 minutes (should be bubbly).


During the time that the mac and cheese was baking in the oven, the leeks and asparagus dish was simmering on the stove. Since both of them had to go for about the same amount of time, we had to do our best to get them on the same schedule if we were going to eat as early as possible (which was not early anyway). Chaotic and busy!


For our first time making mac and cheese from scratch, this was pretty good. My favorite part was the radiatore, which were nice and chewy, and which soaked up the cheese sauce in all of the ridges. There's a reason why it's one of my favorite pasta shapes. Baking your own mac and cheese in the oven also means you get that nice crusty top which was enhanced even more by the bacon-panko topping. As far as flavor, we didn't get a ton of beer or garlic in the sauce. It was mostly bacon and what seemed like a well-flavored cheese sauce. No complaints though. It was a really good mac and cheese.

Monday, April 11, 2016

EK Valley

3 years ago today, we were out in sunny Los Angeles on vacation, indulging in so many fantastic meals that we wouldn't be able to replicate at home. One of the many things that Los Angeles has done better than New York when it comes to food is Oaxacan cuisine (although it's starting to become easier to find some good dishes here), and it's something we try to get whenever we're out there. On that trip, we decided to head over to EK Valley, a small family establishment in Culver City, for dinner with a friend.


The meal started out well with some chips and salsa, which as far as we remember were complimentary. We think we liked them, but hard to say for sure what we thought because back then our trip journal was not as robust as it is now. All we have to rely on for this is our (fading) memories.


For drinks, A went for horchata and M got jamaica (hibiscus). That's usually what happens if we order drinks at a Mexican restaurant, so no surprises there. From what we remember, these were fine.


For her main dish, M got the clayuda (which she had always thought was spelled tlayuda, but let's just go with what was on the menu for now), a Oaxacan dish she had always wanted to try. According to the menu, this was a "large handmade corn tortilla, spread with pork lard and toasted with black bean paste, tomatoes, avocados, quesillo [Oaxacan cheese], cabbage, salsa" and meat, of which there was a choice of tasajo (thin sliced beef), cecina (pork strips), or chorizo. M went with the chorizo. The best way to describe this would be like a crispy pizza. The flavors were fantastic (all that lard?), and while many other memories of Los Angeles have faded 3 years later, eating this is definitely something we remember because it was so good.


A got the mole rojo which came with rice and grilled vegetables. Ever since A had mole in their first trip to LA, he'd always been craving more. When the chance came up to get some more (though this time was red vs black) he had to try it. The mole was beautifully rich and chocolatey with a decent hit of spice to it. The chicken was really moist, and the juiciness held up really well with the sauce. He doesn't remember much about the rice and vegetables, but with everything else being so good, they had to be pretty good as well.


Overall, we had a good meal at EK Valley and wish we remembered more (or had taken notes on our trip!). It was nice being able to spend time with friends before heading out of the city, and it was great getting to have some Oaxacan food, especially that tlayuda. We really wish it were as easy to find this stuff here in NYC as it is in LA.

Sunday, April 10, 2016

Week 11 - Malaysian

We love going out for Malaysian food, but it was challenging figuring out what to make for Week 11 because we didn't have easy access to a lot of the ingredients and didn't have time to get out to Queens just to look for them. Eventually I decided to make mee goreng based on a recipe from Rasa Malaysia, since we really like mee goreng and it had a doable list of ingredients.


I adapted the ingredients list a little bit for what we had and what we could find at the store, so here's what we used:

- 3 bundles of refrigerated Asian style noodles (maybe a little over a lb) ($2.40)
- a tbsp or so of canola oil ($0.20)
- 2 eggs ($0.33)
- 5 cloves of garlic, minced ($0.08)
- a couple cups of bean sprouts ($0.45)
- 1 long Napa cabbage, chopped in rounds and then in half ($1.94)
- 2 boneless skinless chicken breasts, chopped ($3)
- 1 small onion, chopped ($0.21)
- 1 bunch of scallions, about 1/4 of it thinly sliced for garnish and the rest sliced thickly on the diagonal ($0.67)
- 2 tbsp shaoxing wine ($0.10)
- 1/2 tsp white pepper ($0.05)
- fried onion for garnish ($0.30)

For the sauce (all amounts were a slight bit more than what was listed to make sure we had enough once we saw how much other stuff we had):
- 2 tbsp sriracha ($0.15)
- 1 tsp dark soy sauce ($0.10)
- 1 tsp sugar ($0.05)
- pinch of salt ($0.02)
- 3 tbsp oyster sauce ($0.70)
- 3 tbsp ketchup ($0.12)

That added up to approximately $10.87. It did make quite a few servings though, with leftovers for a couple of lunches, so that's not really a bad overall cost.


The steps for making the mee goreng (adapted from the original) were:

1. Prep - chop chicken, onion, garlic, cabbage, scallions, and rinse bean sprouts. Set a large pot of water on the stove to boil.

2. Add oil to wok over high heat and scramble the eggs until they are just setting.

3. During that time, cook the noodles. (Not sure how long since we might have done it a little too long, but even if we didn't, I still don't think it would have had the same texture as what we think of for mee goreng. More on that later.)


4. Add garlic, noodles, bean sprouts, onion, cabbage, chicken, and 3/4 cup of water to wok and stir-fry until everything is cooked.

5. Mix sauce ingredients (A thankfully did this so I could concentrate on the stir-frying) while the ingredients are cooking in the wok.


The stir-frying took much longer than the recipe said it would, but I think that was because we had way more stuff in the wok. For example, instead of 1/2 cup of shredded cabbage, we had 2 bowls. It took a while for everything, especially the chicken to finish cooking. It was worth it though to not skimp on the vegetables as they were the healthiest part of dinner.


6. Once everything is just about done, add the larger amount of scallions (the ones sliced on the diagonal).

7. After stir-frying for a minute or so, add the sauce and stir well. (At this point, our noodle mixture had gotten very thick. These noodles were so starchy that you wouldn't need any corn starch to thicken the sauce at all.)


8. Add shaoxing wine and white pepper, and mix together well.

9. Take off heat and add the remaining scallions.


10. Serve in bowls and add fried onion for garnish.


While this recipe was tasty as an Asian noodle dish, it didn't taste like any mee goreng we'd had before at restaurants. There was just some flavor in those versions that didn't find its way in here. I'm not really sure what that is, but maybe something like squid sauce or fish sauce since that was what was used in a restaurant version of mee goreng we talked about previously on the blog. That said, if you didn't think of it as mee goreng like we know it, but just as some spicy Asian noodles, they were pretty good. We liked the flavors, especially the nice kick to the sauce, and the adjustments I made to add onions, a lot more cabbage, and more scallions gave us a good amount of vegetables to balance out those starchy noodles.

As for the noodles, these are clearly not the noodles you would use for mee goreng but we couldn't find those in the refrigerated case at the Chinese grocery store and I certainly wasn't about to make my own noodles at home. The recipe called for fresh egg noodles, and the ones we got ended up being much thicker and more starchy. I kind of liked the noodles though, and used the rest up in another Asian noodle dish later, this time combining it with the Korean braised tofu from the previous challenge (which I made again; told you I make it a lot). It turned out pretty well there too. I would get the noodles again. I just wouldn't expect them to turn into mee goreng as we know it. All in all, this was a tasty experiment, even if it didn't turn out how we expected.

Thursday, April 7, 2016

Uma Temakeria

We've had Uma Temakeria on our radar for a while, ever since Chef Chris Jaeckle of all'onda opened the first location, mostly because of their hyped sushi burrito (they claim to have been the first in the city to make it), but also because we were intrigued by how they were inspired by the Brazilian temakeria (that is obviously related to our WorldEats interest). Last fall, they opened a second location at the (much closer to us) Gotham West Market, and we finally made it in to try the sushi burrito last weekend.


Since it was our first visit, I decided to go with the "uma-ritto," their namesake sushi burrito, which was $11. I figured that the chef-designed combination might taste better than throwing every possible item into the burrito. The uma-ritto had salmon, tuna, tobanjan mayo, cucumber, carrots, tempura crunch, and sesame seeds. I chose brown rice for the base, and since you could add in any of the free vegetables, I did choose to add in some seaweed salad, figuring that shouldn't detract from the original combo's flavors. While I appreciated that they made everything from scratch after you ordered, it did take over 10 minutes to get the burrito (which from all of our Chipotle experience would seem like a long time for a line assembly), so I'm not sure how that would go at a more peak time.


We liked the sushi burrito, but we don't know that it lived up to the insane amounts of hype that surrounded it when it first came out. It was a nice twist on temaki (hand rolls) and a bit more filling (although certainly not as huge as the person working there made it sound when someone said they wanted a light dinner), and the ingredients did taste good. Honestly though, it's really kind of just a reformatted hand roll, and a little expensive for the size, but tasty for what it is.

Monday, April 4, 2016

English Ale Cheddar with Mustard

It may already be April, but here's our review of the March spotlight cheese!


Product: English Ale Cheddar Cheese with Mustard

Price: $8.99/lb. They came in blocks about 0.5 lb each, but I think that weight included that black wax inedible "shell."


Quick review: Our basic feelings about the taste of this cheese were cheddar - yes, ale (from the Old Speckled Hen English ale) - yes, mustard - not very much. There were hints of mustard in it, but the ale flavor was much stronger. (Apparently there was also white wine vinegar, cinnamon, and dried pimento in addition to the whole grain mustard according to TJ's, but we didn't really notice those.) We were both expecting (and hoping for) so much more mustard flavor from the cheese. Interestingly the mustard flavor came out a bit more when the cheese was heated. We ate blocks of it plain, and then also melted it on top of some panko chicken tenders. Our favorite version of the cheese though was the little shavings that fell off the chicken and just baked on the foil, as those had the most flavor. I seriously thought about taking the rest of the plate of cheese blocks and dumping them all on a foil-lined baking sheet to bake at 400 for a bit, but then was lazy.


Buy Again? If this were in the permanent rotation, I think we'd definitely consider it. It wasn't our favorite cheddar cheese from TJ's (for example, we liked last year's March cheese better), but it was good. It was especially good baked.

Sunday, April 3, 2016

Week 10 - Braised

I've made plenty of braised dishes over the years, including for other challenges, but instead of trying something new for the Week 10 braised challenge, what I decided to do was make one of my current favorite braising recipes which I've never written about here before. About a year ago, I stumbled upon this recipe for Korean braised tofu from the Las Vegas Food Adventures blog. I tried it as written (mostly, as I didn't have chili garlic sauce and needed to make substitutions) and really loved it. Since then, I've made it my own way, but the sauce was really inspired by this recipe, so credit where credit is due.


The ingredients for my version of Korean braised tofu are (and yes, I'm aware that the sauce measurements are horribly imprecise but I don't measure anymore and just adjust to taste as I go; the original inspiration recipe might be better for measurements if you're not inclined to go by taste):

- 1 package of firm tofu, cubed ($1.32)
- 1 onion, chopped ($0.60)
- 1 package of white mushrooms, chopped ($1.99)
- about a tbsp of oil ($0.15)
- a few tbsp of soy sauce ($0.20)
- a couple tsp of sesame oil ($0.20)
- a few shakes of sesame seeds ($0.10)
- 2 large spoonfuls of gochujang ($0.65)
- 1/2 head of garlic, minced ($0.10)
- small batch of scallions, chopped ($0.75)

The total cost for this recipe is approximately $6 (with best guesses on prices for the sauce ingredients), maybe $7 when you include the rice. That's a great price for dinner for 2, so it should come as no surprise that I currently make this quite a bit.


The steps were:

1. Heat oil in saucepan over medium high heat and saute onions and mushrooms.

2. Add tofu and cook the tofu until it starts to get a little more browned.

3. While everything is cooking, make the sauce (or can do it before starting to cook). Mince garlic, chop scallions, add sauce ingredients, and adjust to taste.


4. Pour the sauce over the tofu and vegetable mixture, and stir so that everything is well-coated in the sauce.


5. Reduce to medium low or low heat, and let the mixture simmer for about 5-10 minutes. (The sauce should thicken up and reduce quite a bit. If not, I usually just add a potato/corn starch and water mixture to thicken it.)


It's a really easy recipe to make and other than the mushrooms and scallions (which are easy to obtain), we usually have everything on hand. We love the flavor that gochujang brings to the dish (although I've had to start using more and more because I think our gochujang is getting old), and adding in mushrooms and onions makes it more of a complete dish that we can just eat on its own with rice.


The original recipe that inspired this is pretty great as written too, but I started modifying it mostly to add in more vegetables so we can just make a single dish for dinner instead of a bunch. (Goodness knows it takes me long enough to make one every night.) It has definitely turned out well, and I'm grateful to have found that original one for ideas on a good sauce. This absolutely has a place in our rotation.

Saturday, April 2, 2016

Uttapam Hopes

I was going through some of the old drafts in the archives and stumbled upon this one for Trader Joe's uttapam with coconut chutney, when it occurred to me that I hadn't seen that on the shelves recently. Usually I'm at Trader Joe's at one of two times: (a) when it's really busy and I'm rushing through the aisles snapping up stuff on my list as fast as I can while trying not to get smacked with carts in every direction, or (b) late at night when a lot of stuff is out of stock. So usually I assume if I don't see something, it's probably sold out or I just missed it in my haste. But once that happens for a few months, I start to worry. Unfortunately my worries were justified when it came to the onion rings (I still check their "spot" every visit) and the spinach and kale pie (I am SO SAD that the guy confirmed on our last visit that it was discontinued; it was seriously the best "too busy to cook" dinner and I bought it all the time), and after reading a couple of tweets just now, I'm concerned that the same fate has befallen the poor uttapam.


I used to pick this up fairly frequently for lunch. It was only about $2.50, and in each little green box, there was a plastic bag with 4 uttapam inside and also 2 pouches of coconut chutney. I could usually make that last for 2 lunches (or if A and I ate it together for lunch, one box worked for both of us). It wasn't super filling, but it was a satisfying amount of food.


The uttapam was basically like a mini Indian pizza or pancake with dough made from rice and lentils, and it was topped with lots of onions, cilantro, and green peppers. I love onions and cilantro, so it was like this was made for me to eat for lunch. On top of the great flavors, it was super easy to just pop it in the microwave to heat up. The coconut chutney, which you would heat up by just letting it sit in hot water while the uttapam cooked, was so full of coconut, chiles, and spices. The whole thing was just packed with flavor, definitely not for people who prefer more bland food. It was so good.


I hadn't picked up the uttapam for at least a few months, mostly because I had been buying it a lot for lunch and wanted to take a little break and eat different things. When I started looking for it again, I didn't see it, but I never had it specifically on my list so I don't really know how long it's been gone. Sitting here now thinking about this, I'm concerned about some of our other favorites. We've already lost things like the nasi goreng and biryani that were our staple dinners 10 years ago, and countless other favorites have gone missing over the years. (I've been tormenting myself by reading all the Trader Joe's "discontinued" tweets while writing this post, and was just reminded of the jalapeño cheese crunchies and informed about the charmingly chewy chocolate chip cookies. Sigh.) How many boxes of something do I have to buy to stop something from getting discontinued?!


I'm hoping that maybe it's just a temporary supplier issue or maybe someone got the wrong info from whoever it was at their Trader Joe's and the uttapam aren't really gone, but I know that's unlikely. (But if it's like the soy chorizo, it can always come back!) If anyone knows for sure if the uttapam are gone, please tell me. I'll be sad, but at least it'll be closure.