Tuesday, January 17, 2023

Afghan Pesto Pizza

A few days after the kofta pizza, it was time for our second Afghan pizza! I used the same recipe page from Afghan Culture Unveiled, this time for the pesto pizza. I hadn't been sure originally if I was going to make both or just the kofta one, but we had a bunch of cilantro laying around, which was a main ingredient in this pesto, so it made a lot of sense to make this too.


Instead of making my own pizza dough or even using a ball of pre-made pizza dough, this time I opted for some prepared pizza crusts from Trader Joe's. That saved a lot of time and effort, since I didn't even have to let the dough sit or roll it out. I had never tried these before, and they barely fit into our reusable bags and our fridge, but now having tried them, I am a fan since they are incredibly convenient.


The pesto consisted of a bunch of scallions, a lot of cilantro, fresh lemon juice, olive oil, and salt. In the 1.5-year span since we first did our Afghan food exploration, we became proud owners of an immersion blender, which was perfect for making this (and which I probably would use in the future if we were making something like the shor nakhod again).


The last component (besides the cheese topping) was a combination of yogurt and feta cheese designed to mimic quroot, since I had no idea where to find that and the recipe recommended this combo as a substitute.


The yogurt sauce went on top of the crust, followed by the pesto, and then the whole pizza was topped with mozzarella cheese. Everything together was amazing. I was so impressed by the combination that I knew immediately that I would want to make this again sometime. The pesto just had so much flavor, and it was different from any other pizza or flatbread we'd had before. Although we were eating a lot of pizza in a very short time, I was glad that we had expanded the AtWCC to add a pizza for each place, because we had already had two great pizzas!

Monday, January 16, 2023

Kofta Pizza

At the end of the last post, I mentioned rounding out our exploration of Afghan cuisine and moving on to Alabama, so it would be logical if you thought the next post in this series was going to be either a summary of our Afghan journey or our first Alabama dish. Surprise! It's another post about Afghan cuisine here.

As the AtWCC has progressed over the past few years, it's evolved in so many ways. We broadened our "walk around the world" to include countries out of order (mostly thanks to the 52 week cooking challenge, but also other things). I originally was only going to do a few dishes for each country, since it's impossible to cover everything from everywhere, but then decided to keep going until it felt "done," like we'd had a good sampling of different types of offerings.

The most recent evolution of the challenge was to include a pizza for every location. I had already been aiming to spotlight bread for each location (whether making it myself or just focusing on bread, now that the bread-baking height of the pandemic has passed), but considering one of B's favorite foods is pizza, that seemed like the next logical addition. Pizza or flatbreads or similar foods exist in so many places, but even where they don't, making a pizza with ingredients celebrating a particular locale seemed like it would work. Not a great addition for my cholesterol or triglycerides, especially since the whole wheat pizza dough at Trader Joe's seems to have been discontinued, but definitely a fun exploration.


Since the pizza idea didn't arise until spring 2022, and we were already working our way through Albania at that point, that meant going back to the places we "finished" to make some "catch-up" pizzas. The first place we returned was where we started, Afghanistan, but we didn't only return to make pizzas. Earlier in 2022, I learned about a cookbook called Parwana, full of Afghan history, culture, and family stories, written by a family that runs restaurants in Australia. I'm not sure how I didn't find it before in all my googling for Afghan cookbooks, but alas, I did not. I was so intrigued by so many recipes there that I started making those alongside all the rest of our AtWCC projects. With all those additional meals to make, it did feel sometimes like we would never be done with the As, but it's been so worth it. More on the Parwana recipes in future posts.


Back to the pizza. One of the blogs about Afghanistan culture and food that I really enjoyed during the first part of our journey was Afghan Culture Unveiled, and sure enough, they had some ideas for pizzas right there! There was a pesto one and a kofta one, and I decided to go for the kofta one first. The first step was making the meat sauce. The recipe used lamb, but I went for beefless beef, which was combined with onion, garlic, tomato, tomato paste, salt, pepper, paprika, and ground coriander. On top of the meat sauce went some rounds of mozzarella and sprinkles of feta.


This pizza was a great way to kick off our AtWCC pizzas! The sauce was delicious on its own, and it made for a good base for the cheese. I think if I made it again, I would just use shredded mozzarella instead of the rounds so it would be spread and melted more evenly, but that's about it. It reminded me a bit of a lasagna pizza with a meat sauce on the bottom topped with cheese. Despite pizza being one of his favorite foods, B actually didn't eat much of the pizza, but that might have been my fault for giving him too many mozzarella rounds and crumbles of feta before dinner. We ate this with a salad on the side, and it was a wonderful pizza night!

Tuesday, January 10, 2023

Kabuli Pulao

I had put together an entire list of recipes I wanted to try to make for the Afghanistan portion of AtWCC, but there was one conspicuous absence from the list - kabuli pulao, Afghanistan's national dish. Most of the recipes I had come across for kabuli pulao at that point seemed so complicated, and the last thing I needed was to attempt a recipe that was going to literally take all day. It just didn't seem right, though, to explore Afghanistan's cuisine without making the national dish, especially since it was something we could actually make and eat (i.e., not something with eggs or deep-fried or requiring red meat). I went back and searched some more, and I found what seemed like a doable recipe for kabuli pulao on International Cuisine, so that became the final piece of our exploration of Afghan cuisine.


The ingredients for our version of kabuli pulao (switching the meat to chicken and leaving out the apricots) were:

- 1 cup basmati rice
- 3-4 medium carrots
- 1 large boneless skinless chicken breast (about 0.75 lbs)
- 1-2 tbsp olive oil
- about 1 tbsp cumin
- 4 cardamom pods
- 2 cinnamon sticks
- 1 small box of raisins
- 2 small pinches of saffron threads
- salt and freshly ground black pepper
- 2 tbsp sugar

I intended to follow the recipe closely (since we've made a similar dish, plov, before, which has not always been the most flavorful), but my slowness moving around the limited space in the kitchen, trying to balance this with making naan from scratch, and things on the stove cooking faster than expected led to some unplanned modifications. The steps we followed were:

1. Wash rice and soak for 20 minutes. Drain and cook according to package instructions, but cut the time in half (and then drain and set aside if necessary).

[I added the amount of water the package said to, and cooked it for about 12-13 minutes instead of their recommended 20 (got sidetracked working on other prep). When I opened the pot, the rice had absorbed all the water, and it was fully-cooked instead of being half-boiled rice. As a result, I could skip the steps of draining it and setting it aside, and I didn't have to time the final simmering.]

2. Prep work - peel and grate carrots, cut chicken.

[I seriously estimated wrong for timing on this step, because I forgot just how long it takes to grate carrots!]

3. In a large skillet over medium heat, add the olive oil, and then cook the chicken until golden brown.

[The next step after this was supposed to be adding a cup of water and some salt, and letting it simmer until the meat became tender, but I was already being splashed with hot oil when I stirred the chicken and had no desire for it to become worse. Also, chicken is already more tender than lamb, so a long, tenderizing simmer wasn't as necessary. Plus, it was so much later in the night than I was expecting when I got to this point, so I didn't feel like doing that.]


4. Add the carrots, raisins, cumin, cardamom, cinnamon sticks, salt, and pepper. Stir well. Add about 1/2 cup of water, cover, and cook for a few minutes.

[The cumin was supposed to be added with the rice while it cooked, but I forgot. I added about 2 tsp here and more in the next step.]

5. Add the rice and saffron, and stir well. Taste and adjust seasonings as necessary.

[This was where I added some more cumin and also some black pepper.]

6. Heat the sugar in a small pan over low heat until it melts, and then add 1/2 cup of water, and mix well. During this process, add (regular) water (not the water from the first sentence) a couple tbsp at a time to the rice mixture in the skillet if it's starting to stick.

[I added water a lot, at least 5-6 times, probably more. It kept sticking to the bottom of the skillet, but at least the browned bits added flavor. This step took much longer than expected, and if I were to do this again, I would start this much, much earlier. I had never melted sugar before, so when it wasn't working, I looked it up where it said it could take as long as 5 minutes, so I went to work on the naan dough, and before I knew it, it had burned, so we had to do it again. This time, it seemed to refuse to melt so we added the water early and then mixed it up. Seemed fine.]

7. Add the sugar mixture to the rice and stir well. Cover and simmer for 5-10 minutes to let the flavors meld.

[I didn't actually count the minutes, but just left it there until the naan was done.]


We really liked this! In contrast to some of the plov I've made before, this one just had so much more flavor, maybe due to the whole spices used or the saffron threads. Outside of grating the carrots and figuring out the sugar pan, none of the steps were especially time-consuming, so I could see this being something we make again (although maybe not with from-scratch bread-making at the same time). Very happy that this was how we rounded out our exploration of Afghan cuisine!

Monday, January 9, 2023

Afghan Naan Take Two

I don't remember how I got there, but in looking at Afghan recipes, I ended up on one for naan on My Ginger Garlic Kitchen. I had already made naan during our Afghan food exploration, but since it didn't come out that similar to the one we liked at our favorite Ariana, and the one on this site looked much closer, I figured, why not give it another try? At the time, we had one last meal scheduled for the Afghan part of the challenge (the kabuli pulao in the next post), so I decided to make the naan to accompany it.


The ingredients for this bread were very similar to the last one, just in different amounts:

- 3 cups + 1 tbsp flour
- 1 tsp salt
- 2.25 tsp yeast
- 1 tsp sugar
- 2 tbsp olive oil
- about 1 tbsp butter
- 1 cup + a few tbsp warm water

I had intended to do a cost comparison of the two, but over two years later, that's not going to happen, because I have no idea where my old pricing list is and I can't look up any current prices with all the inflation that has happened since then.


I followed the recipe fairly closely to make the naan, and the steps were:

1. In a small bowl, combine 1 cup of warm water, yeast, and sugar. Let it sit for about 10 minutes. (It should look foamy.)

2. In a large bowl, combine 3 cups of flour, salt, and olive oil. Mix well.

3. Add the yeast mixture to the flour mixture, and mix well.

4. Knead for about 5 minutes until one big dough ball that's not too sticky.


5. Cover bowl with plastic wrap, and let sit for about 2 hours for the dough to double in size (or close to it).

6. Gently punch down the dough after the proofing time.

7. Preheat oven to 400 degrees while rolling out the dough.

8. Divide dough into two balls. [See below about a possible step before this one.]

9. Create a mixture with the remaining flour and water, and apply it to your hands.

10. Using your hands, flatten out the dough balls into ovals about 1/4 inch thick. Use a fork to make patterns and lines.


11. Bake until browned, about 10 minutes. Melt butter while baking.

12. Brush with butter, cut into pieces, and place on a plate under a foil tent to keep warm and soft.

The results of this naan experiment were puzzling. The first ball rolled out so much better, but then didn't rise. The second ball had holes everywhere when I tried to roll it out, so I ended up rolling it back up into a ball, kneading it a little more, and then trying again. I couldn't get it as thin as the recipe suggested, but sort of gave up, but that one turned out better and actually rose.


When I went back to the recipe page and watched the demonstration video (which I probably should have done before I made it), I noticed that nowhere in the instructions did it say to knead the dough again between punching it down, dividing it, and rolling it into a ball, but in the video, there was another kneading step. I ended up kneading the second ball again because of my poor rolling, so was that why it turned out better? I'm not experienced enough at bread baking to know, so if anyone has any ideas on why they turned out differently, I'm all ears (or, I guess, eyes).


From the picture, I really thought this one was going to turn out more like the Afghan bread we were used to getting at restaurants, but it was fairly similar to the other one we made (well, at least the second oval that actually rose was). Both were soft and fluffy, but the other one seemed a little more consistently fluffy and would probably be the one we'd go back to again since it turned out more successfully in our kitchen.

Saturday, January 7, 2023

Cotechino con Lenticchie

In our year in review for last year, I mentioned that we've done a lot of hoppin' John and collard greens for New Year's Day, but that this year we wanted to try something different. The plan was cotechino con lenticchie, the traditional Italian New Year's dish of pork sausage with lentils, maybe with some collard greens on the side for extra vegetables (although the side dish didn't end up happening). Pork and lentils are both supposed to be good luck ingredients, which is why they often feature in New Year's recipes.


I looked at two recipes when putting together our dinner plan: one from Spruce Eats and one from Not Quite Nigella, and combined them along with elements from the many YouTube recipes I watched. Cotechino is the star of the dish, a Northern Italian sausage, but I had no idea where to get it (and not much time to look), so I just went with sweet Italian pork sausage, a substitute I did see in some recipes. The sausage is simmered in broth until done (about 40-45 minutes) and then sliced up. I saw that some people gave it a quick saute in a pan afterwards, so I did that too. I also pulled off the casings post-boiling, which I think was a good move texturally. I saved the broth (straining out all the fat) to cook the lentils.

For the lentils, I soaked them while I was preparing everything else, so they cooked really fast since I am so slow at prep. Before the lentils themselves went into the pot, I added onions, celery, carrots, garlic, sage, and tomato paste (one at a time, in steps), and then once ready added the lentils with the broth, topped up with another cup or two of water to fully cook the lentils. Once they were done, the sausage was put on top, and some parsley sprinkled for garnish.


This was a tasty dish. The lentils didn't have any seasoning besides the broth (a little distracted that night), but still had a fair amount of flavor (would have been better with some salt, pepper, and other stuff added, but too late once realized). Combined with the sausage, it was pretty good together.

While the plan was to eat this for dinner on New Year's Day, it ended up being a rushed dinner on the 2nd of the year. Unfortunately, B was sick all through New Year's, and on the 1st of the year, we were monitoring the severity of his symptoms, and it just got too late in the night to make it. I started cooking earlier on the 2nd even though his symptoms were worse, and finished making dinner shortly before we made the call to go to the hospital. So, I did fully make the dish, we did try it, and it was tasty, but I will probably never schedule it for New Year's (or possibly ever) again given all the surrounding circumstances that I do not want to repeat.

Friday, January 6, 2023

Qorma-e-Sabzi

The last component of our Afghan dinner, accompanying the chapli kebab and the naan and tomatoes, was qorma-e-sabzi, a slow-cooked, stewed spinach. I had been trying hard, despite the pandemic, to make sure we got enough vegetables in our diet, and a bowl of tomatoes just didn't feel like it would be enough to offset all that "meat" and bread. I wasn't sure how B would like it, since it's a little harder to eat spinach with your hands or rudimentary fork skills (wrote this post in 2020 too...), but at least it would be good for the adults. I liked the recipe I found on Mom's Kitchen Handbook because it looked simple and because it could be made in a pot without any extra equipment like a slow cooker.


The ingredients for our adapted version were:

- 1 tbsp olive oil ($0.20)
- 1/2 of a big bunch of scallions ($0.64)
- 1/2 of a small bunch of cilantro ($1)
- 1 bag frozen spinach ($1.49)
- 1 tbsp dried dill ($0.10)
- 2 tsp ground coriander ($0.25)
- a couple dashes of cayenne pepper ($0.03)
- salt and freshly ground black pepper ($0.03)
- about 1.5 tbsp lemon juice ($0.29)
- water ($0)

The total amount of the spinach recipe was approximately $4.03, which when added to the other components (chapli kebab - $11.72, naan - $1.97, and a box of grape tomatoes - $2.69), resulted in a grand total of $20.41.


The recipe said that prep time would take 4 minutes and cook time 36 minutes, so it seemed like a simple enough recipe. I know I take a long time with prep, possibly longer than most amateur cooks, but I don't understand how 4 minutes is enough time to wash scallions, chop scallions, wash cilantro, pull cilantro leaves off the stems, and chop the cilantro, even for an experienced chef. What am I missing in terms of technique? We didn't even have the scallions and cilantro washed in 4 minutes. Anyway, the steps for our version of the spinach were:

1. Prep - chop scallions and cilantro.

2. Heat olive oil in a pot over medium heat. [I used too big of a pot for one bag of spinach. Learn from my mistake!]

3. Add the scallions, and cook for a few minutes until softened.

4. Add the frozen spinach, and let it cook until you can break up all the frozen chunks.


5. Add the dill, coriander, cayenne, and about 1/4 cup of water. Stir together and cook for 20 minutes on medium low heat. Keep stirring regularly, and add water, a tbsp or so at a time, to keep it from drying out. [This worked well until my focus shifted to rolling out the naan, and the spinach dried out a little while it was neglected. Didn't seem to hurt it that much though.]

6. Add the cilantro, salt, pepper, and lemon juice, stir, and let cook for another 10 minutes.


The recipe was fairly straightforward and simple, other than the need to keep monitoring the spinach to make sure it didn't dry out. It seems like a good recipe to make if you're actively cooking something else on the stove for that half-hour and can just give it a good stir and water replenishment every so often. That said, for a spinach side dish, the prep time for us with the scallions and cilantro (really, the cilantro more than anything) took too long to make this very often. I did like the flavors a lot, and it was delicious with the naan. But as predicted, B was not much of a fan, and got a little frustrated by it even after we helped him eat some of it. Maybe we'll revisit this when he's a little bit older because the flavors are great. (2023 note: Spinach is one of the few green vegetables B eats now, but only contained in other things, like spinach pie.) Maybe we'll also be faster at prepping cilantro by then (but probably not).

Thursday, January 5, 2023

Chapli Kebab

Most of this post was written in July 2020. I've chosen to leave most of the text the same and just add some updates.

Reading through my new favorite Afghan food blog, Afghan Culture Unveiled, I found a recipe that really intrigued me: chapli kebab. I had only eaten chapli kebab once before, back in 2009 at the Vendy Awards from the Biryani Cart. It was one of my favorite things from that awards day, but I was never able to get it again because they never had any when I went to the cart for lunches at work. I hadn't realized that they made chapli kebab in Afghanistan as well, but figured it might not be exactly the same as what I had since the folks behind the Biryani Cart weren't Afghan. (I think the main chef was a native of Bangladesh.) Some additional reading online informed me that chapli kebab originated from Peshawar, today northwest Pakistan, located right on the border of Afghanistan, so that makes a lot of sense.

The first chapli kebabs we ever had - a bit more orange/red than any recipes I've found online and have no idea how to make these!

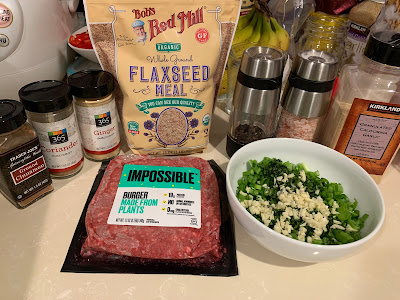
Once I had my heart set on making chapli kebab, there were two hurdles. One, a lot of recipes use ground beef, which I don't really cook with. When I was planning this one out, we made a visit to one of the few stores in the area that sold Impossible Burger (2023 note: what a difference 2-3 years makes. Now in 2023, Impossible is everywhere and we buy it all the time), and I picked up a few packs. We'd tried Impossible Burger at a restaurant before, and it did taste remarkably like beef, so I thought maybe we could give it a try here and see how close it came to the real thing. The second hurdle was the egg being used as a binder. We had heard a lot about flax eggs but never tried them, so this seemed as good a time as any. (We might be on our third bag of ground flaxseed at this point in 2023 - lots of flax eggs have been made since then.) With those changes, the very meaty, burger-like chapli kebab turned into a vegan version in our kitchen.


The ingredients for our version of the chapli kebab were:

- 1 package of Impossible Burger ($8.99)
- 1/2 of a large bunch of scallions ($0.65)
- 1/2 of a small bunch of cilantro ($0.99)
- 1 flax egg ($0.08)
- salt and freshly ground black pepper ($0.03)
- garlic powder ($0.05)
- 3 cloves of garlic, finely chopped ($0.20)
- about 1 tsp dried ginger ($0.05)
- about 1 tbsp ground coriander ($0.40)
- a couple dashes of ground cinnamon ($0.08)
- about 1 tbsp of olive oil ($0.20)

The cost of the chapli kebab was about $11.72. It would have been a little over $7 if we had chosen to use ground turkey instead of Impossible Burger, but we really wanted to see how close it would come to tasting like beef. We, of course, finished it all, and it was just one component of a dinner that ended up costing approximately $20 (the final post on this dinner about spinach will have the breakdown).


The steps for making our chapli kebab were:

1. Prep - chop scallions, chop cilantro, chop garlic.

2. Mix together all ingredients in a large bowl. [Apparently, flax eggs take 5 minutes to make, which I didn't know in advance, so I mixed that in last.]

3. Knead the meat for 5 minutes.

4. Heat olive oil in large skillet. Roll the meat mixture into about 8 balls, and cook for a few minutes on each side until browned and cooked through.

I love ground meat dishes, and being able to use Impossible Burger, to not have to worry about various bacteria that hitch a ride on raw meat, to not have to worry about undercooking the meat, and to also know that it's better for the environment, has been great. I had made meatballs with it a couple of weeks earlier as a test run, and the things we liked and were amazed by then were still true here. How do they make soy taste like actual red meat? How do they make the product so that it gets that browning and charring just like actual meat does? Science is pretty incredible stuff.


Anyway, back to the chapli kebabs. They came out so well. The flavorings were excellent. They didn't stay together quite as well as they probably would have with an egg, but they were still really good. We ate them with some sliced up raw tomatoes and the naan (previously written about for the 52 week cooking challenge), just like in the recipe photo, and that was such a great combination. Such flavorful "meat" with refreshing tomatoes wrapped up in pillowy naan, what's not to love about that?


I guess I should ask B, because he ate maybe a third to a half of one kebab and didn't seem to like it very much. I don't know if it's because it did taste like meat (since he hadn't loved eating red meat in the past all the time), if it was because he found it too crumbly, if he wasn't in the mood for the spices today (even though he's had them before), if he was just too distracted by the more appealing (to him) bread and tomatoes, or if he was just being a toddler, but he wasn't a huge fan of it. (2023 note: I've tried it several times since then, and it seems very hit or miss for him still.) A and I really liked it though, constantly marveling at how it could possibly taste just like meat. I would make this again, maybe with Impossible Burger, maybe with ground chicken. (2023 note: It's been Impossible every time.) Happy to have found a good recipe for chapli kebab!

Wednesday, January 4, 2023

The Middle Third

Quick blurbs on the middle part of the challenge, many of which feel so long ago. Besides challenges already posted (at least there were a few this time!), skipping weeks 19, 24, 25, 28, 30 for the shared AtWCC posts that will come at some point, and week 21 because I wrote most of it already.

Week 18: garlic


The Tasty recipe was called 40 clove garlic chicken, but the three heads of garlic I used ended up being around 45. We love garlic in our household, so even more garlic was not a problem! This was delicious, and not as garlicky as one would think for 45 cloves. It was much more manageable than the vegetable pizza covered in whole roasted garlic cloves that I ate at Planet Hollywood when I was around 10 (still remember that one; it made an impact). We would definitely make this again.

Week 20: zero waste


We had a few very ripe bananas on the counter that I forgot about, so turned them (and a bunch of other ingredients already in the pantry) into banana pancakes based on a Nora Cooks recipe, so they wouldn't go to waste. Not really much else to say about this challenge. The banana pancakes were fine, but we've made pancakes like this, possibly even these exact ones, before.

Week 27: made the wrong way


In what will probably be my best-performing post ever on Reddit, I made falafel waffles. This one really stumped me because I personally don't really think that many things can be made the "wrong" way. Unconventional, maybe, but not necessarily wrong. I went with falafel waffles, because they sounded fun, and using the "wrong" appliance/cooking method seemed like the closest I was going to get to finding something to complete this challenge. Apparently it was a winning idea, but I don't even remember where I first heard about it years ago. We made the falafel in the waffle maker and topped the waffles with salad. I also attempted to fold one around the salad, sort of like the Taco Bell naked chicken chalupa, but it all fell apart. This was fun to try.

Week 29: shredded


I think this July dinner is where the series of chicken salads began. I made the poached chicken and cabbage salad with cashews and miso dressing from Kenji’s cookbook, The Wok, and it had lots of shredded ingredients - chicken, carrots, scallions, and cabbage. I also added corn so B would have something he liked. This was a very refreshing summer salad.

4 more done, 18 more to go!

Tuesday, January 3, 2023

Week 6 - Medieval

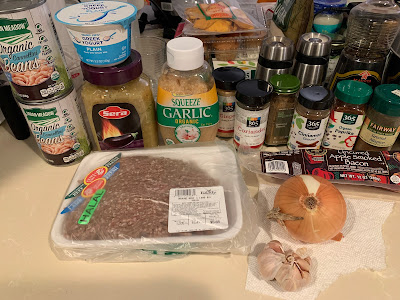
The week 6 theme, medieval, was also a repeat (this time, 2016), and it was just as challenging this time around. I researched recipes again, but found myself right back at the same Game of Thrones site (Inn at the Crossroads). I didn't want to repeat the exact same meal as last time, but the white beans and bacon (recipe) were so tasty that I decided to make them again. Plus, B generally likes beans and bacon, and he wasn't around yet when we made it last time, so it would be new to him.


I was really intrigued by one of the pages called Salladhor Saan’s Shipboard Dinner. I’ve still never read or watched anything Game of Thrones, but the dinner included medieval Arabic lamb meatballs in an eggplant sauce, which immediately sparked my interest. Although we don’t really cook much red meat at home by choice, I decided to make an exception here to follow the recipe closely and use ground lamb, since I don’t have enough experience in medieval cooking to know if there would really be an appropriate substitute. The store only had a ground beef and lamb mix, so that’s what I got.


The meatball and eggplant portion of dinner took a while, even though it sounded so simple on paper and I took shortcuts. There were two main parts - making the eggplant and making the meatballs. The eggplant, if following the recipe, would have been time-consuming, as you had to roast the entire eggplant. Instead, I grabbed a jar of roasted eggplant from the store, and it worked just fine. To the eggplant, I added about 3 oz of plain Greek yogurt, two squeezes of garlic from the bottle (about 2 cloves minced), some salt, a little sesame oil, and some ground coriander. So easy and fairly quick.


The meat portion took longer. First, since I don’t really buy ground red meat, I had to check on the cooking temperature and also do some freshness tests (like sniff test, slime test, etc), especially since the meat had turned an unappealing brown compared to the red hue it had when I bought it. Once the meat was in the bowl, I added paprika, salt, and pepper, along with a little cumin and cinnamon, kneaded it all together, and rolled out some meatballs. A little olive oil in the skillet, and in went the meatballs.


The cooking instructions here were where things didn’t go quite as expected. They said to fry the meatballs until browned, to add water to cover, and to simmer for about 10 minutes. The medieval source cookbook did mention to cook the meatballs in the water until it evaporated, which seems like it would have taken far longer than 10 minutes based on how much water was left in ours, especially since we didn’t even fully cover the meatballs with water. The texture also didn’t really change during the water-simmering step, so if I were to make these again, I’d probably just skip it. We thought we had to do it so we could throw the eggplant-yogurt sauce into the same pan, but I ended up just heating that separately, adding a little bit of the water from the meatball skillet, and putting the meatballs on top, which I think we liked much better than the other way.


The eggplant sauce was fantastic, and I would definitely make that again. It was also a really good complement for the meatballs. I don't know if I would buy this meat mix again, as I feel like Impossible would have worked just as well. The white beans and bacon were, of course, good. Overall, the meal was nice, but our favorite part was probably that eggplant sauce.

Sunday, January 1, 2023

Week 3 - Turkish

Happy new year! I've already cooked week 3 for the 2023 challenge, so I really need to catch up and post these single-digit challenge weeks from the 2022 challenge ASAP!


Week 3 was Turkish, and I decided to give one of my favorite Turkish dishes, mercimek koftesi, another try. I did it the last time Turkish came up in the challenge back in 2014, but it had been a long time since I last made it, definitely before B came along. This time, I found some new (to me) recipes at 196 Flavors and Vidar Bergum, combined elements of those with the one I came up with last time, and hoped for the best after about six hours of chilling them in the fridge.


The recipe I posted back in 2014 is still fairly close to what I ended up doing after consulting with the other two recipes, except that the pastes and seasonings were added to the onions first, then the lentils, bulgur, and onions were mixed in a mixing bowl and not on the stove, and then the scallions and parsley were added at the very end once the flavors had been adjusted. So, the ingredients were similar, the order of operations was a little different, but the general idea of mixing them together was the same. I did notice that I used far more of each paste than the recipes did in order to get the color and flavor to our liking and what we remembered from our favorite restaurant versions (and it was not because the biber salcasi got old and lost flavor; it was new), but we were happy with how it turned out.


The mercimek koftesi may not have been the most attractive dish (I couldn't get them shaped as well as the professionals), but it was definitely tasty. I still love this vegetarian kofta as much as the first time I tried it, and now that I have fresh pepper paste and bulgur (well, almost a year opened now...), I think I should make it more often!