Wednesday, January 27, 2021

Week 3 - Indonesian

The last time the Indonesian challenge came up (in 2015), I tried to make nasi goreng, and while it tasted like fried rice, it didn't taste like any nasi goreng we had had before. It was just missing something. For the Indonesian challenge this time, I wanted to make something different. I looked through lots and lots of delicious-sounding recipes, but wasn't sure what to make since there were many ingredients I didn't have access to, especially during a pandemic when we couldn't shop around at specialty stores. I eventually decided on mie goreng, a fried noodle dish, based on a recipe I found on Recipes Indonesia. Even though I knew I would need to make substitutions, it at least seemed doable. Also, unlike the last time I did the Indonesian challenge, this time I had a bottle of kecap manis (Indonesian sweet soy sauce) and didn't have to try to fake the flavor with other things.


I made a lot of substitutions, perhaps too many since the finished product (spoiler alert) wasn't like any mie goreng we had eaten in Indonesian restaurants before. (If you think this is sounding like a repeat of last time's nasi goreng, you would be right.) We couldn't get to an Asian grocery store before making this, so the only noodles we had were spaghetti. I used a can of chicken instead of an actual chicken fillet, trying to save a little money since our grocery bill that week was higher than usual. Instead of slicing up my own cabbage and carrots, I got coleslaw mix, something we've used as a substitution before when cooking that has done well. Instead of choy sum, I used a little baby bok choy. The store had no bean sprouts. I left out the chiles, except a little bit of sambal, because I didn't want it to be too spicy for B. We left out the eggs because of our allergy, fried onions, and parsley. With all the ingredient changes, it was a somewhat different dish, but they all seemed like similar enough substitutions that could potentially work at the time I planned it out.

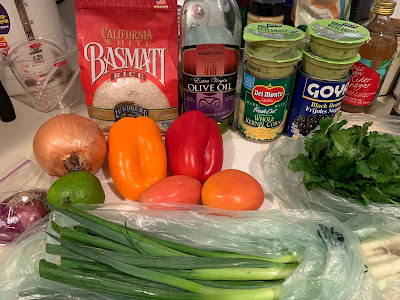
Non-traditional ingredients for mie goreng

The ingredients for our version were:

- 1 package of whole wheat spaghetti ($1.39)
- 1 tbsp grapeseed oil ($0.10)
- 3 large shallots ($1.43)
- 6 cloves of garlic ($0.33)
- 1 can of chicken ($1.92)
- 1 bag of coleslaw mix (green cabbage, red cabbage, carrots) ($2.99)
- 1 baby bok choy ($0.75)
- 7 scallions ($0.99)
- 1 small spoonful of sambal oelek ($0.05)
- about 1 tsp chicken bouillon ($0.10)
- about 3 tbsp kecap manis ($0.84)
- about 2 tsp soy sauce ($0.10)
- white pepper to taste ($0.05)

The noodles cost about $11.04 on their own. We ate them with some stir-fried bok choy and red onion on the side that I made in the same wok right afterwards, and they tasted pretty good together. The total cost was about $13.73, a great price for dinner for three and a lot of food. There was a (very) little bit left for the next day.

I generally followed the same procedure to make the noodles as the original recipe, but with a couple of significant differences. One was skipping all the egg-related steps. The other was that, instead of grinding the shallots and garlic into a paste, I just fried them in the oil. I didn't have time to make a paste, and we only had a wooden mortar and pestle that I didn't want to forever smell like shallots and garlic. It probably would have been better as a paste, but I don't think it would have made so much of a difference as to change our final conclusions on our version of the dish. The steps we followed were:

The original recipe said five shallots, but this was three shallots, so I stopped there. Thankful for the goggles we bought and never used for COVID, because they have become onion and shallot goggles...

1. Prep - finely chop shallots, finely chop garlic, rough chop baby bok choy, chop scallion greens and whites into medium-sized pieces and keep separated, make sauce by combining the chicken bouillon, kecap manis, and soy sauce, boil water for spaghetti. [I started that last one way too late, which delayed everything and made our vegetables a little too soft.]

2. Heat grapeseed oil in a hot wok. Add shallots and garlic. Fry until fragrant.

3. Add chicken, stir-fry for a little bit, and then add the sambal oelek. [If using actual chicken fillets, this would obviously be a much longer step until the chicken was mostly cooked.]

4. Add the coleslaw mix, baby bok choy, and scallion whites. Stir-fry until beginning to soften. [That was the intention, but getting to step 5 took far longer since the water wasn't boiling yet.]

5. Add noodles, scallion greens, and sauce. Mix everything together well, and make sure sauce is evenly distributed. Adjust to taste. [It was a little too bland for us, probably because we had so much stuff in the wok. We added more kecap manis and more soy sauce here as well as a little white pepper.]


The noodles were good, a little on the blander side but with a nice mild flavor. They were not, however, something we would have ever guessed as mie goreng in a taste test. Similar to our last Indonesian cooking experiment, it just felt like there was something missing, and I'm really not sure what it was. The chiles? Too little sambal? Not enough sauce? Too much/too many noodles in the wok? They just tasted like lo mein to us with nothing distinctly Indonesian. Maybe next time I try making Indonesian rice or noodles, I'll finally get it right.

Tuesday, January 26, 2021

Week 2 - Meat Substitute

When I saw the Week 2 theme, meat substitute, I had every intention of using something like Impossible Burger or Beyond meatballs or Trader Joe's beefless beef to substitute for meat. But then I put a vegan meatloaf I really wanted to try (recipe from Nora Cooks) on the meal plan for the first week of the new year, and remembered that meat substitute didn't just mean some commercially-engineered meat substitute but also things like chickpeas that could stand in for meat. I was really excited to try out this recipe, since unlike some others it didn't need a food processor or a blender, and also because I love meatloaf.


The ingredients for our version of the meatloaf were:

- 1 small onion ($0.19)
- 3 medium carrots ($0.46)
- 2 large celery stalks ($0.30)
- large spoonful of minced garlic ($0.05)
- olive oil spray to grease pan ($0.10)
- olive oil for sautéing vegetables ($0.10)
- 2 cans of chickpeas ($1.93)
- about 1/2 tsp liquid smoke ($0.05)
- 1 cup panko bread crumbs ($0.75)
- 2 tbsp ground flaxseeds ($0.16)
- 3 tbsp nutritional yeast ($0.15)
- 2 tbsp soy sauce ($0.15)
- 2 tbsp + 2 tsp Worcestershire sauce ($0.60)
- 4 tbsp + 1/3 cup ketchup ($0.42)

The total approximate cost for the meatloaf was $5.41. I had to run the calculations twice, because I was in disbelief at the low cost. We paired it with a can of green beans, which meant dinner for three was under $7. It was only the second week of the challenge, but I think this might end up being our most affordable meal of the whole challenge year, based on how much our meals usually cost.


The steps for making the meatloaf were:

1. Prep - chop onion, carrots, and celery into small pieces. Drain and rinse chickpeas. Preheat oven to 375 degrees, and spray loaf pan (used 9 inch pan) with olive oil spray.

2. Heat olive oil in skillet. Add the onion, celery, and carrots along with garlic. Cook until onions are translucent. Remove from heat and cool.


3. In a large mixing bowl, add the chickpeas. Use a potato masher to break them up (but stop before they get pasty or mushy). [This step took far longer than I thought it would, mostly because I used one can of Goya chickpeas, which were soft and mashable, and one can of Trader Joe's chickpeas, which were hard and similar in texture to nuts. The latter refused to be crushed and only sometimes split in half, no matter how hard we mashed. They only got harder with baking too. I won't be using those again, partially because I would rather have a smoother texture for the meatloaf, and partially so I don't spend the entire dinner worried about the chickpeas being nut-like choking hazards.]


4. Add the vegetables to the chickpeas, along with the liquid smoke, panko, flaxseeds, nutritional yeast, soy sauce, 2 tbsp of the Worcestershire sauce, and 4 tbsp of the ketchup. Mix well, and then scoop into a loaf pan and smooth out the top.

5. Cover loaf pan with foil, and bake for 30 minutes.


6. Mix together the rest of the Worcestershire and the ketchup for the glaze.

7. Remove loaf pan from oven after the 30 minutes, remove the foil, and spread the glaze evenly on top. Return to oven, and bake for 15 minutes uncovered.

8. Remove from oven, and let it sit for about 15 minutes [it was late - we did 5-10 minutes]. Slice and serve.


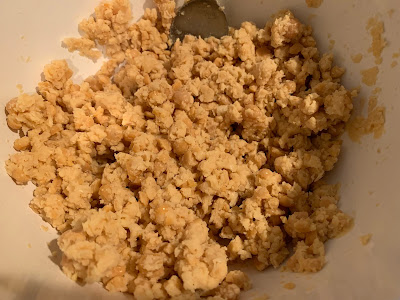
The meatloaf was delicious. A little heavy on the Worcestershire flavor, but I personally like that, so I thought that was great. The texture wasn't the same as you would get from ground meat, but I don't know if that would have been different without the hard nut-like pieces of chickpeas that we had thanks to the TJ's chickpeas. I would absolutely make this again, but I will try to be wiser with my choice of chickpeas.

Friday, January 15, 2021

Sparkling Honeycrisp Apple Juice

I'm not a huge fan of carbonated drinks, so I've mostly ignored the seasonal sparkling beverages at Trader Joe's, despite the raves for previous flavors like watermelon and strawberry. But when the sparkling honeycrisp apple juice cans came in last fall, I knew we had to try them. We hadn't bought any honeycrisp apples during the season, and this sounded like it might be their version of Martinelli's, which was popular in my family during lots of holiday dinners.


The ingredients were simple - just honeycrisp apple juice, water, and carbon dioxide - and the flavor was great. It tasted just like a sweet, ripe, crisp apple, but not too sugary sweet. We found it really refreshing, although A noted it might not be the best use of so many honeycrisp apples. (It's been so long since we've had actual honeycrisp apples!) It was also nice that they came in four cans instead of one big bottle, so that you didn't have to drink too much at one time. (I thought the news said there was an aluminum can shortage, so I'm not sure how they got their hands on so much of this when beer distributors are having issues, but I'm glad they did!)


Buy again? Sure. I think we could pick up a box of these every fall and be happy with a nice bubbly treat. If all the other flavors are as good as this one, we might even try some of those too!

Saturday, January 9, 2021

Week 1 - Last Meal

I felt all sorts of emotions when the first challenge of 2021 came up as last meal. I was sad, angry, and upset, because what kind of challenge theme was that?! Coming off of a 2020 that saw such tragedy, why would you start off the year with something so depressing, dark, and dreary? Why wouldn't you want to look ahead to 2021 and try to start it on a bright, optimistic note? [I wrote most of this post before the insurrection... What a start to the year.] Who wants to think about having their last meal at a time when COVID is surging? What an incredibly morbid theme. I was kind of surprised that they went there at all during a pandemic, but especially for the opening theme of the year. I also felt disappointed. I don't like skipping weeks, especially not the first one, but there was also no way I was going to participate in this thought exercise.

I apparently wasn't the only one that felt that way, and there were lots of comments on Reddit from people who found the theme similarly bleak. Some took it to even darker, sadder places, like what it would mean to have the same last meal as someone executed on death row. Not things I want to think about to set the tone for the year. Thankfully, other people came up with less negative lenses through which to view the challenge, one of which was the last meal of the Before Times, the last meal out before lockdown, the last meal at a restaurant before the entire world closed down. For us, the last time we ate out before everything started to get shut down was a family meal at Qdoba. It's a really happy memory for me, just being able to see and eat with family in the middle of so much uncertainty (as we could definitely feel the coronavirus dangers lurking at the time), and B was having a great time at that dinner, dancing to the music and enjoying his Mexican food. So, our challenge meal was set - copycat burrito bowls.


There were a lot of moving pieces for this dinner if we were going to make our own burrito bar, and I don't think I really anticipated just how involved it was, so I started making dinner way too late. The whole process took about 2.5 hours, which meant another late challenge dinner. Outside of the guacamole, for which we just used Kirkland guacamole singles, there were six different dishes made from scratch: copycat Qdoba grilled chicken, cilantro lime rice, fajita vegetables, black beans, corn, and pico de gallo. The black beans and corn weren't going to be replicas of Qdoba, just quick microwavable dishes since I did not have the time for that, but I wanted to make our burrito bowls as similar as possible otherwise.


The ingredients were:

for the chicken (adapted from recipe on Gimme Delicious, did not measure dry spices):

- 1.5 lbs chicken tenders ($8.99)
- big spoonful of minced garlic ($0.05)
- 2 tbsp olive oil ($0.20)
- about 1 tbsp chili powder ($0.10)
- about 1 tsp cumin ($0.05)
- about 1 tsp oregano ($0.05)
- salt and freshly ground black pepper ($0.03)
- adobo sauce ($0.58)

(Note that the recipe called for 2 tbsp of adobo sauce, but I didn't have any and wasn't sure if it would be too spicy for B, so I went with a substitute I found on Pepper Scale, omitting the cayenne. I ended up using about 1 tbsp tomato paste, 1 tbsp apple cider vinegar, about 1 tsp smoked paprika, about 1/2 tsp cumin, a pinch of oregano, and a pinch of garlic powder, again not measuring the dry spices, with the total approximate cost reflected in the list above. I mixed that together first, and it tasted far closer to adobo than I thought it would, lacking some of the depth and not very spicy, but that was just what I needed here!)


for the rice (adapted from Skinnytaste):

- 1 cup basmati rice ($1)
- juice of 1/2 lime ($0.25)
- 2 cups water ($0)
- about 1 tsp salt ($0.02)
- 1/2 big bunch of cilantro, finely chopped ($0.44)
- about 3 tsp olive oil, divided ($0.10)

for the fajita vegetables:

- olive oil spray ($0.30)
- 1 orange bell pepper, sliced into strips ($1)
- 1 red bell pepper, sliced into strips ($0.91)
- 1 large yellow onion, sliced into strips ($0.79)
- salt ($0.02)
- oregano ($0.05)

for the black beans:

- 1 can black beans ($0.94)
- a little olive oil ($0.05)
- salt, black pepper, garlic powder, oregano ($0.08)

for the corn:

- 1 can corn ($0.96)
- scallions (see note with pico de gallo) ($0.20)
- a little olive oil ($0.05)
- salt, black pepper, garlic powder ($0.06)

for the pico de gallo:

- 2 roma tomatoes, diced ($0.81)
- 1/2 red onion, finely chopped ($0.39)
- 1/2 big bunch of cilantro, finely chopped ($0.45)
- 4 scallions, greens finely chopped, whites thinly sliced on the diagonal - split with the corn (all the whites used in the pico, 1/3 of the greens used in the pico and the rest in the scallions) ($0.23)
- juice of 1/2 lime ($0.25)

The cost for our burrito bar was approximately $22.90 ($10.05 for the chicken, $1.81 for the rice, $3.07 for the fajita vegetables, $1.07 for the black beans, $1.27 for the corn, $2.13 for the pico de gallo, and $3.50 for 3 packages of guacamole). Two burrito bowls plus a kid's meal at Qdoba runs us about $20-25, but while their portions are large, this was still more food than we would have gotten there. Well, maybe not more rice, but definitely more chicken.


The first thing I made was the chicken because it needed to marinate. I was too tired to do it the night before, so it ended up only marinating for about 4 hours or so. It was still delicious, but next time I think I would try to marinate it longer. I mixed the substitute adobo sauce first, then added the rest of the marinade ingredients, and then added the chicken tenders, stirring them around until they were all covered with sauce. The covered bowl sat in the fridge until it was time to grill.


Prep was the thing that took the longest. (Wish I had taken a photo of that mountain of cilantro!) I worked on the tomatoes, onions, peppers, scallions, and cilantro the bulk of the time, but after that the pico de gallo was done and mixed, ready to sit out and meld until everything else was done. A started on the rice while I finished the prep, which definitely helped get everything done.

For the rice, we basically followed the Skinnytaste instructions, which were to add the rice, a tsp of oil, water, and salt to the pot, boil it until the water just skims the top of the rice, cook covered on low for 20 minutes, and then keep it covered with no heat for at least 5 minutes. (We left it covered and steaming until everything else was done.) The last step was to mix the rest of the olive oil with the cilantro and lime juice into the rice.

After prepping, I moved on to the fajita vegetables, cooking them in a grill pan that was sprayed with olive oil. This was my first time using the grill pan for active cooking after seeing someone doing that on YouTube. Previously, I only ever put things on the pan to grill like you would on an outdoor grill, but the vegetables cooked exactly the way I wanted them to this way. They were still a little harder and crunchier than I would have preferred when they came off the pan, but I put them in a bowl covered with foil to steam until everything else was done, and the texture was perfect.


Once the vegetables were done, it was time to grill the chicken. A took over at the grill pan, so I could put together the bowls of black bean and corn in the microwave, and the timing worked out well. Even though our meat thermometer said they were done, a few of the pieces of chicken weren't fully cooked when I went to chop them after resting, so we threw them back in the pan. Even after that, the chicken was still juicier than what you normally get from Qdoba and Chipotle.


I wish I had gotten a photo of A's first bowl, because he made it look exactly like the ones we would get at Qdoba, piled high with a dollop of guacamole on the top. We were all really happy with this meal. I love burrito bowls, and it felt so good to have a from-scratch burrito bowl that we made in our own kitchen (other than the guacamole). The chicken flavoring was delicious, the rice was fluffy, the fajita vegetables were texturally great but just needed a little more seasoning, the black beans and corn were easy and tasty, and the pico de gallo added a bit of freshness. Although I love pico de gallo, it was actually my least favorite part, although A might be right that my opinion here is biased by the fact that it was also the thing that took the longest to prepare.


What would I do differently, since I would love to make burrito bowls part of our regular rotation? I would marinate the chicken longer. Otherwise, the marinade was great, and I'm glad we got pre-sliced tenders from the grocery store, which were perfect for this. I would add a little more seasoning to the fajita vegetables, but otherwise change nothing. I would omit the cilantro and maybe the lime from the rice, because the cilantro takes so long to prep and regular rice would be fine. I would buy pico de gallo from the store or just use salsa instead. (They didn't have any this time, which is why I made my own.) I would do the same thing with the corn and the black beans, since they were simple and quick. Basically, I would use some shortcuts to make it so that burrito bowls wouldn't take me 2.5 hours. If I didn't make my own pico de gallo and didn't prep any cilantro, then I could just make the rice while cooking the vegetables, and make the black beans and corn while grilling the chicken, and the whole thing would be so much faster. Can't wait to try that out in the future!